# 5-2 Vuex 核心概念與結構
在前一個小節裡面,我們已經安裝 Vuex 到我們的專案裡頭了, 那麼在這個小節裡面我們就繼續來為讀者們說明 Vuex 的結構,以及如何使用在專案上。
# Vuex 的結構
前面是一個最簡單的範例,介紹 Vue 元件如何從我們的 store 裡面取得資料。
除了取得資料之外,前一個小節也曾經提到,Vuex 對於狀態的寫入與更新也有著對應的限制。
那麼接下來我們就繼續往下深入理解 Vuex 所提供的各種 API 與功能。
下面這張是幾乎所有講 Vuex 的時候都會看到的流程圖:
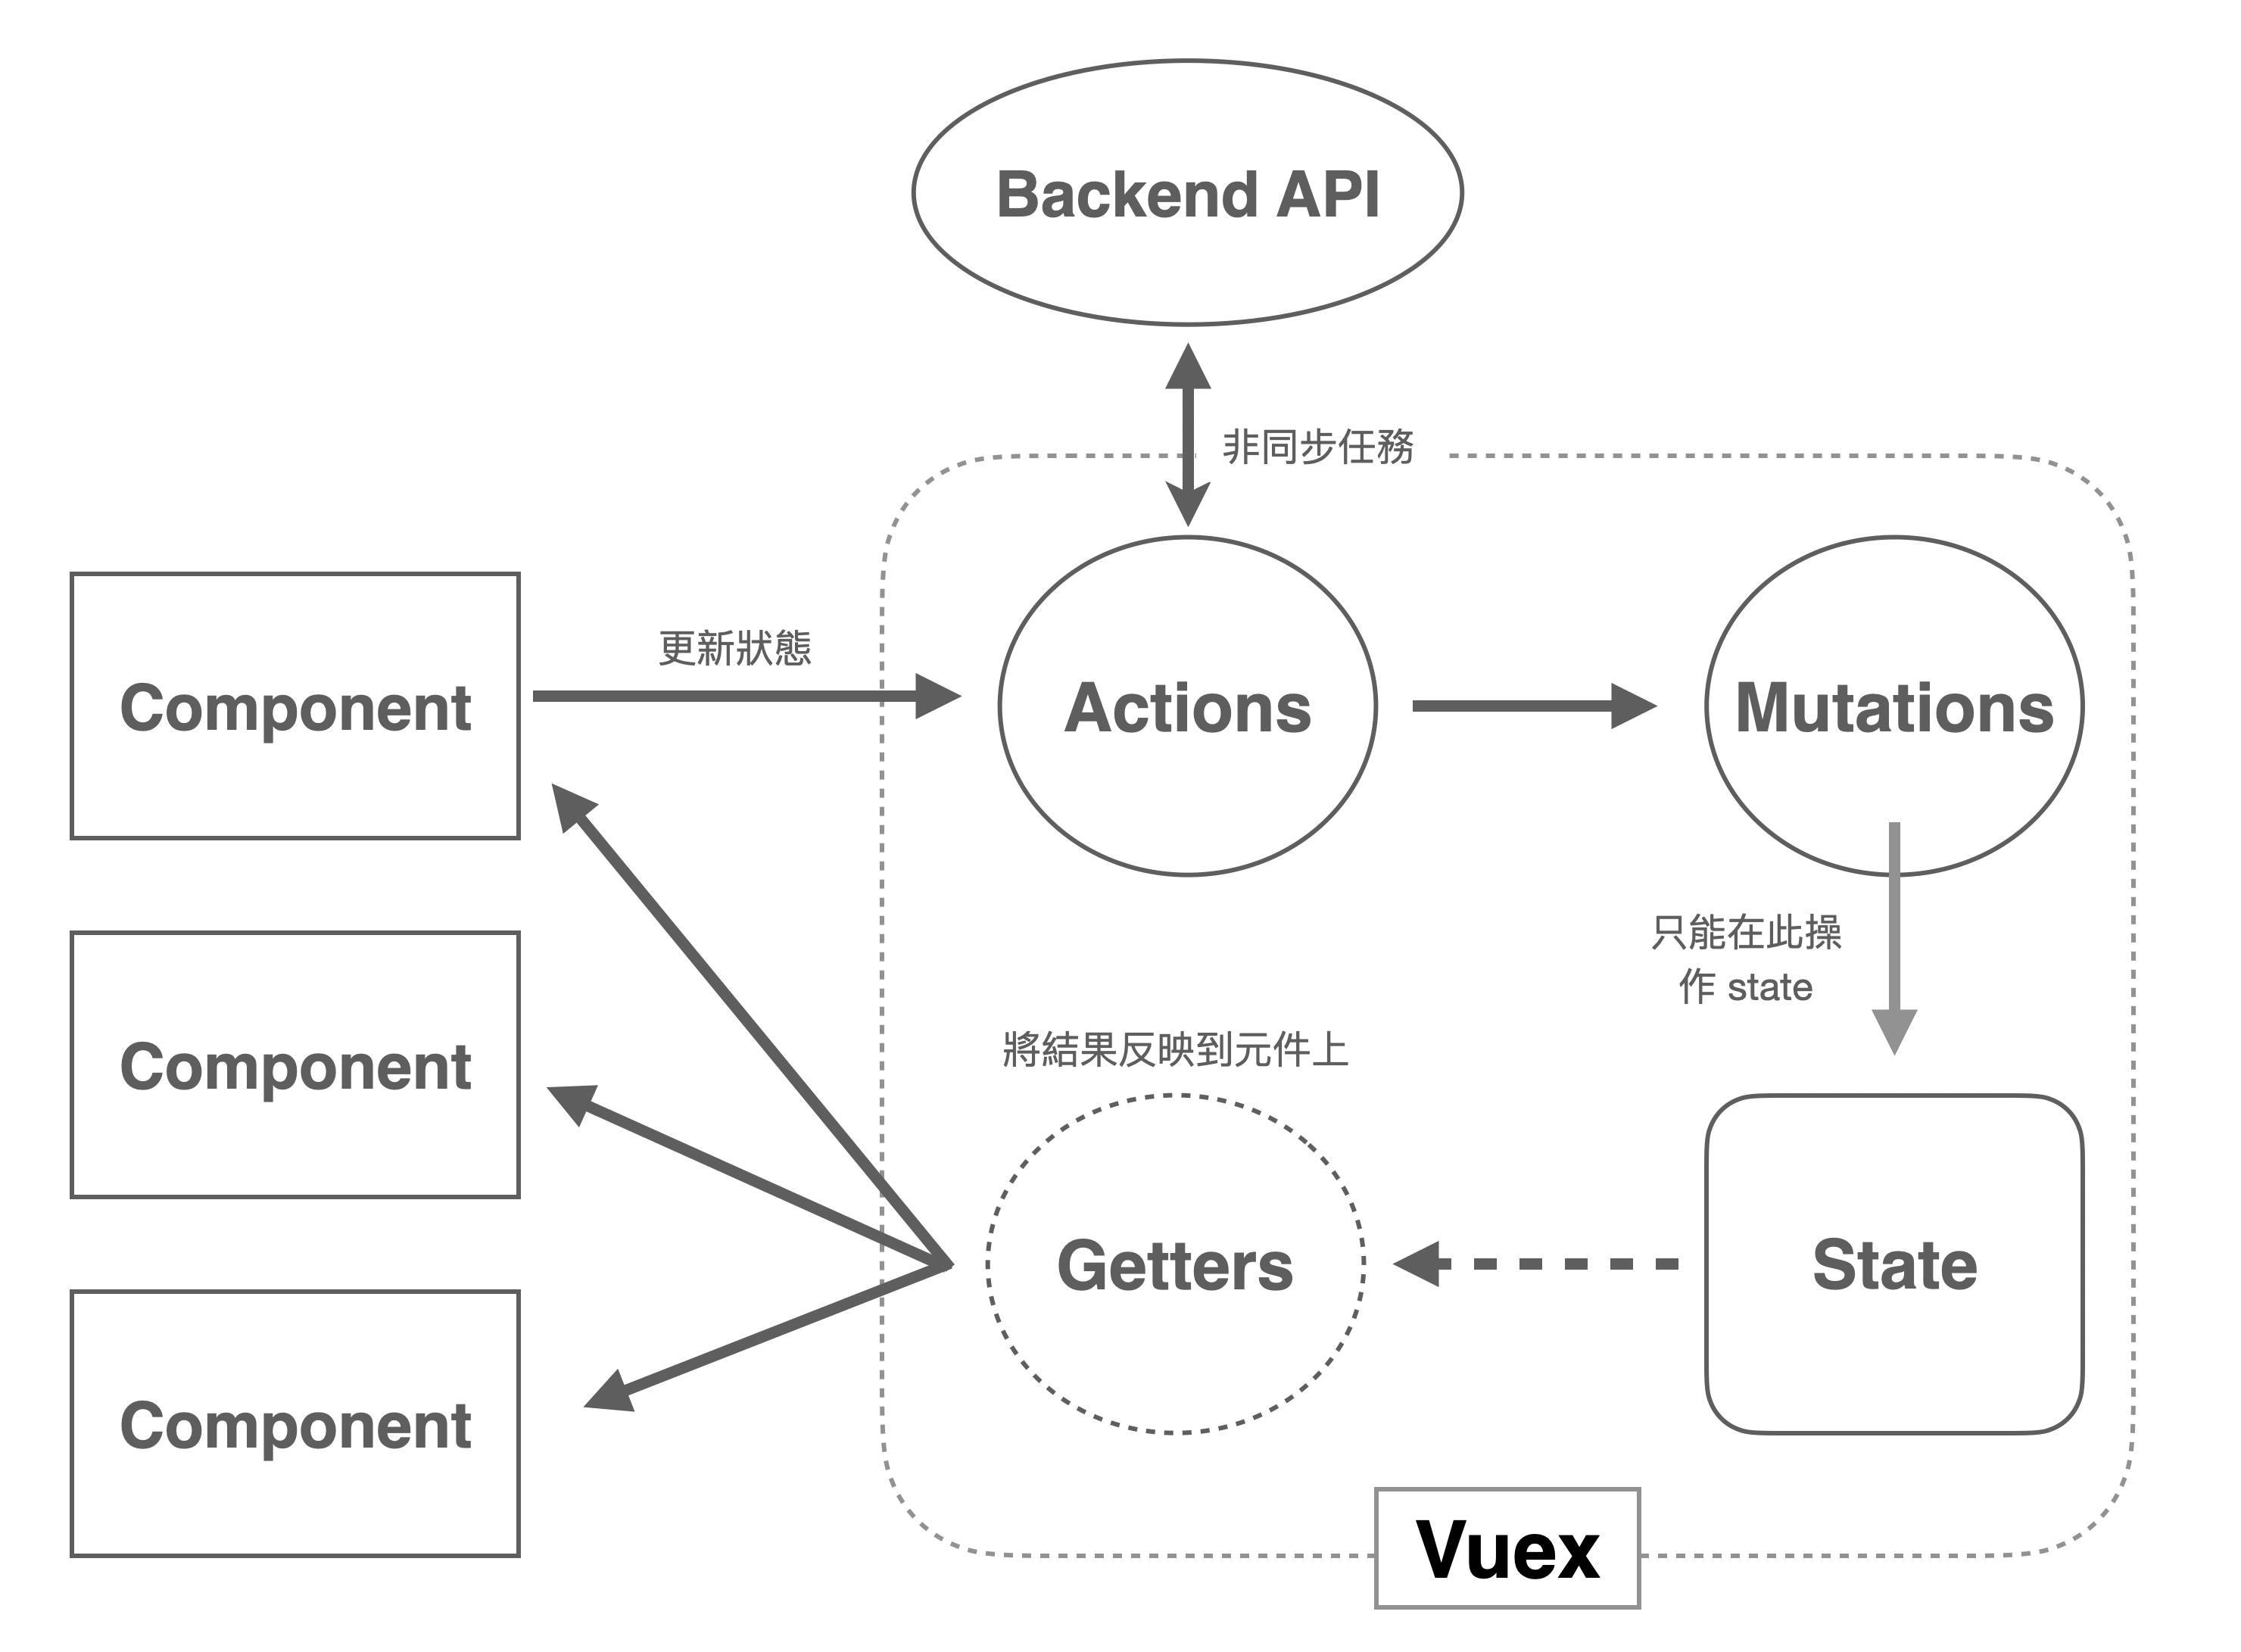
Vuex 的主要結構大致上可以分為 state、getters、mutations、actions 四個部分,圖中右下角的 state 就是我們用來放置共用狀態的地方,我們就從這裡開始講起吧。
# state
前面我們有提到,安裝好 Vuex 之後,會需要新增一個 store.js 的檔案,這個檔案就是我們前一小節所說的倉庫:
import { createStore } from 'vuex'

export default createStore({
  state: {
  },
  mutations: {
  },
  actions: {
  },
  modules: {
  }
});
2
3
4
5
6
7
8
9
10
11
12
首先,我們需要把「共用的狀態」 從元件的 data 移動到 state 物件裡面來,假設叫做 greeting:
state: {
  greeting: 'Hello 008 Vue.js!'
},
2
3
那麼在對應的 Vue 元件裡,就必須要透過 computed 屬性向我們的倉庫 store 來取得資料。
我們修改一下預設的 App.vue:
<template>
  <!-- Hello 008 Vue.js! -->
  <h1>{{ greeting }}</h1>
</template>

<script>
export default {
  name: 'App',
  computed: {
    greeting () {
      return this.$store.state.greeting;
    }
  }
}
</script>
2
3
4
5
6
7
8
9
10
11
12
13
14
15
這時候若想要在另一個元件也取得這個 greeting 時,也只需要加入 computed 並透過回傳 this.$store.state.greeting:
computed: {
  greeting () {
    return this.$store.state.greeting;
  }
}
2
3
4
5
就可以順利取得 greeting 的資料了。
找不到 state 嗎?
如果在執行時 console 主控台出現 Uncaught TypeError: Cannot read property 'state' of undefined 的錯誤訊息,千萬別緊張,這個時候檢查一下你的 main.js 是否有 import 我們剛剛建立的 store,並且再透過 .use(store) 將它掛載到我們的 Vue.js 實體裡頭。
// main.js
import { createApp } from 'vue'
import App from './App.vue'
import store from './store'

createApp(App).use(store).mount('#app')
2
3
4
5
6
像這樣,透過 createApp 建立 Vue 實體並加上 .use(store) 掛載 Vuex 的 Plugin 之後,我們就可以在這個應用內「所有的」元件使用 this.$store 來取得這個 Vuex 的倉庫了。
另外,main.js 的 .use(store) 並不是強制的,我們也可以只在需要存取 store 的元件內將 store import 進來:
<template>
  <h1>{{ greeting }}</h1>
</template>

<script>
import store from './store';

export default {
  computed: {
    greeting: () => store.state.greeting
  }
}
</script>
2
3
4
5
6
7
8
9
10
11
12
13
這樣的寫法甚至連 this 也不需要了。
# mapState
隨著專案的成長,如果我們每次新增資料就要增加一筆 computed 來取得對應的資料,寫多了難免會覺得囉唆且麻煩。
不過還好 Vuex 提供了 mapState 這個函式提供我們一口氣將多筆狀態引入進來。
假設我們 state 的資料長這樣:
state: {
  product: '008-JS',
  price: 500,
  quantity: 100
},
2
3
4
5
那我們就可以利用 Vuex 提供的 mapState 傳入陣列:
// 使用 mapState 前需要先 import 進來
import { mapState } from 'vuex';

export default {
  name: 'App',
  computed: mapState([
    'product',
    'price',
    'quantity'
  ])
}
2
3
4
5
6
7
8
9
10
11
此時 Vuex 的 mapState 會回傳一個物件,這個物件的內容會是我們原本寫在 computed 內的 function,所以像這樣就可以順利一次取得 product 、 price 以及 quantity 三種資訊了。
但是,像這樣的寫法會將整個元件的 computed 吃掉,若我們還想在 computed 裡面新增其他屬性,那就必須要利用 ES6 的物件解構 ... 語法來改寫:
export default {
  data () {
    return {
      name: 'Kuro'
    }
  },
  computed: {
    ...mapState([
      'product',
      'price',
      'quantity'
    ]),
    author () {
      return `${ this.name }好帥`;
    }
  }
}
2
3
4
5
6
7
8
9
10
11
12
13
14
15
16
17
像這樣,我們就可以同時包含 mapState 與元件本身的 computed 屬性了。
小提醒
而 mapState 除了可以使用陣列之外,也可以使用「物件」的形式來指定我們希望它在此元件裡的 key:
computed: {
  ...mapState({
    productName: 'product'
  }),
}
2
3
4
5
像這樣,原本在 state 的名稱叫 product,到了這個元件所使用的名稱就變成了 productName 。
甚至再進一步,我們也可以寫成函式的形式:
computed: {
  ...mapState({
    productName: state => state.product
  }),
}
2
3
4
5
透過 state 參數來取得裡面的 product,而且因為裡面沒有使用 this 的關係,可以讓它變成箭頭函式的形式,讓程式碼更簡潔。
# getters
看完 state 接著來介紹 getters。
Vuex 裡的 getters 我們可以將它看作 「store 的 computed」 會比較好理解。
舉例來說,同樣是前面的 state:
state: {
  product: '008-JS',
  price: 500,
  quantity: 100
},
2
3
4
5
假設我們今天想要針對這個商品進行促銷,當然我們可以在取得 state 之後的元件內部自己使用 computed 計算:
computed: {
  ...mapState([
    'product',
    'price',
    'quantity'
  ]),
  sellingPrice () {
    // 售價打八折
    return this.price * 0.8;
  }
}
2
3
4
5
6
7
8
9
10
11
可是,如果說這個促銷的價格會同時在網頁的多個元件裡使用時,如果我們將打折的邏輯散落在各個元件內,那麼就有可能出現售價不一致的錯誤。
基於我們在之前介紹過的「單一資訊來源」 (Single Source Of Truth) 原則,我們應該先將結果計算好,而元件直接取用計算後的售價來顯示才會是比較好的作法,這個時候就得派上 getters 來處理了。
像這樣,我們可以將原本打折的邏輯搬移到 Vuex 的 getters 裡:
state: {
  product: '008-JS',
  price: 500,
  quantity: 100
},
getters: {
  sellingPrice (state) {
    // 售價打八折
    return state.price * 0.8;
  }
},
2
3
4
5
6
7
8
9
10
11
然後在需要取得打折後售價的元件內,與 state 一樣,透過 computed 來取得:
computed: {
  sellingPrice () {
    return this.$store.getters.sellingPrice;
  }
}
2
3
4
5
注意這裡是 this.$store.getters 不要打錯了。
另外,在 getters 裡面除了可以取得 state 的資料外,我們也可以在 getters 裡面取得另一個 getters 的資訊。
例如,商品售價的折扣改由依照庫存量來決定,當庫存超過 50 時打八折,否則打九折:
state: {
  product: '008-JS',
  price: 500,
  quantity: 100
},
getters: {
  discount (state) {
    // 當庫存超過 50 打八折,否則打九折
    return (state.quantity > 50) ? 0.8 : 0.9;
  },
  sellingPrice (state, getters) {
    // 動態折扣
    return state.price * getters.discount;
  }
},
2
3
4
5
6
7
8
9
10
11
12
13
14
15
像這樣,我們可以在第二個參數取得 getters 的內容,售價就會依照 getters.discount 的不同而有所變動。
# mapGetters
另外,與 mapState 一樣,Vuex 針對 getters 也提供了 mapGetters(),使用方式與 mapState 幾乎一樣,
computed: {
  ...mapState([
    'product',
    'price',
    'quantity'
  ]),
  // mapGetters 同樣也要先 import 才能使用
  ...mapGetters([
    'sellingPrice'
  ])
}
2
3
4
5
6
7
8
9
10
11
讀者們可以參照前面的 mapState 的說明使用,這裏就不再逐一贅述。
# mutations
講完了從 store 提取資料的方式之後,接著我們來看看怎麼寫入 store 裡的狀態。
根據 Vuex 的規定,修改 state 的唯一方式是透過提交 (commit) 某個 mutations 的屬性。
而透過 mutations 來修改 state 的方式也很簡單:
state: {
  product: '008-JS',
  price: 500,
  quantity: 100
},
mutations: {
  setQuantity (state, payload) {
    state.quantity = payload;
  }
}
2
3
4
5
6
7
8
9
10
像這樣,我們在 mutations 裡面定義一個 setQuantity 以及它的 callback 函式,裡面會有兩個參數,分別是 state 以及傳遞進來的數值 payload。
當我們今天想要更新 state.quantity 的時候,就在元件內新增一個 methods updateQty ,並且將它綁定到某個按鈕的點擊事件上:
<template>
  <input type="text" v-model.number="qty">
  <button @click="updateQty">Click</button>
</template>

<script>
export default {
  data () {
    return {
      qty: 0
    }
  },
  methods: {
    updateQty () {
      // 注意 'setQuantity' 是字串!
      this.$store.commit('setQuantity', this.qty);
    }
  }
}
</script>
2
3
4
5
6
7
8
9
10
11
12
13
14
15
16
17
18
19
20
於是,當點擊這個 <button> 的時候,元件就會向 store 提交 (commit) setQuantity 這個 mutations,並且將 this.qty 內的數值作為參數傳遞出去。
另外,如果我們今天希望 commit 出去的東西是個物件型態的資料時,也可以這樣寫:
this.$store.commit({
  type: 'setQuantity',
  qty: this.qty
});
2
3
4
這時對應的 mutations 就需要改成
mutations: {
  setQuantity (state, payload) {
    state.quantity = payload.qty;
  }
}
2
3
4
5
即可正常運作。
mutations 其實是事件?
Vuex 的 mutations 我們可以把它看作是某種類似「事件」的機制,當我們在 mutations 裡面宣告某個方法的時候,與其說我們定義的是個方法,倒不如說我們是在 store 裡面定義某個自訂的事件比較貼切。
當這個事件被觸發的時候,我們就可以透過它所對應的回呼函式 (callback function) 去更新 state 裡面的狀態。
這也說明了為什麼我們在提交某個 mutations 時需要使用「字串」的形式去調用它。
小提醒 - Vue 的版本差異
在 Vue 2.x 的時候,若我們在 state 尚未定義某個狀態,需要使用 Vue.$set(state, 'XXX', value) 才能寫入新的狀態。
雖然從 Vue 3.0 開始無此規定,但還是建議各位讀者盡可能將會使用到的欄位在 state 預先定義好,減少未來維護時的意外與「驚喜」。
# mapMutations
與前面兩組一樣, Vuex 也提供了 mapMutations 方法來對應 mutations,大幅簡化了原有的 mutations 寫法:
<template>
  <input type="text" v-model.number="qty">

  <!-- 注意這裡的 setQuantity 帶有 qty 參數 -->
  <button @click="setQuantity(qty)">Click</button>
</template>

<script>
import { mapMutations } from 'vuex';

export default {
  data () {
    return {
      qty: 0
    }
  },
  methods: {
    // 回傳 mutations 裡的 setQuantity 同名函式
    ...mapMutations(['setQuantity'])
  }
}
</script>
2
3
4
5
6
7
8
9
10
11
12
13
14
15
16
17
18
19
20
21
22
像這樣,我們可以透過 mapMutations 將 setQuantity 引入到元件內,而 mapMutations 會回傳一個對應的 setQuantity 方法,並且隱含將此方法的參數自動帶入 payload 的功能。
另外由於 Vuex 的規定,修改 state 的唯一方式是透過提交 (commit) 某個 mutations 的屬性 (很重要再講一次),所以在 mutations 裡面的所有操作都必須是「同步」的任務,這樣 Vuex 才有辦法紀錄與追蹤我們對 store 的每一次修改。
也就是說,我們無法在 mutations 裡面使用 async/await 或 promise 等非同步的操作。
# actions
actions 的作用類似 mutations,但最大的不同是它不能直接操作 state 裡面的資料。 也因此,我們可以在 actions 裡面執行非同步的任務,再將回傳的結果提交給 mutations 去更改狀態。
讓我們再次修改上面的範例,這次我們將 state.product 設定為一個空物件,並且在 actions 加上 fetchProductInfo 這個函式:
state: {
  product: {},
},
mutations: {
  setProductInfo (state, payload) {
    state.product = payload;
  }
},
actions : {
  fetchProductInfo (context, payload) {
    // api 回傳 { "id": "008", "name": "008-JS", "price": 500, "quantity": 100 }
    fetch('...')
      .then(res => res.json())
      .then(data => context.commit('setProductInfo', data) );
  }
}
2
3
4
5
6
7
8
9
10
11
12
13
14
15
16
actions 裡面定義的函式分別接受兩個參數物件,第一個是 context ,第二個是 payload。
context是一個與 Vuex 實體相同的物件,雖然它們具有相同的方法與屬性,但並不是store本身,我們可以透過調用這個物件對store來進行操作。 也就是說,如果我們想在某個action去dispatch另一個action時,也可以透過context.dispatch('...')來達成。payload則與mutations裡面的payload意義一樣,指的是從外面傳入的值。
當這個 fetchProductInfo 被派發 (dispatch) 的時候,會透過 fetch 對後端的 API 發送請求,並將後端 API 回傳的結果透過 context.commit() 提交給 setProductInfo。
換句話說,我們可以在 Vue 元件的 created 或 mounted 階段向 fetchProductInfo 發送 dispatch:
export default {
  created () {
    this.$store.dispatch('fetchProductInfo', { id: '008' });
  }
}
2
3
4
5
這樣就可以在 Vue 元件實體被建立的同時,向後端發送 API 請求,並在回傳結果後透過 mutations 來存入 store 了。
小提醒
若 actions 回傳的是個 Promise 物件,我們甚至可以在 this.$store.dispatch(...) 加上 .then() 來執行後續的動作。
# mapActions
當然,Vuex 針對 actions 同樣也提供了 mapActions 方法,以前面的範例來說,我們可以這樣改造:
import { mapActions } from 'vuex';

export default {
  methods: {
    ...mapActions(['fetchProductInfo'])
  },
  created () {
    this.fetchProductInfo({'id': '008'});
  }
}
2
3
4
5
6
7
8
9
10
這樣就可以做到與 this.$store.dispatch('fetchProductInfo', {id: '008'}); 同樣的效果了。
# modules
在這個小節的最後,我們來談談不在 Vuex 流程圖裡面的 modules。
當我們專案的規模越寫越大, state 存放的資料越來越多,同樣地也會面臨管理不易的問題,
這個時候 Vuex 所提供的 modules 就是我們的救星。
在 modules 裡面,我們可以針對每一個 module 分別定義它們的 state 、 mutations 、 actions 與 getters。
舉例來說:
const moduleA = {
  state: () => ({ ... }),
  getters: { ... },
  mutations: { ... },
  actions: { ... }
};

const moduleB = {
  state: () => ({ ... }),
  mutations: { ... },
  actions: { ... }
};

export default createStore({
  state: { ... },
  getters: { ... },
  mutations: { ... },
  actions: { ... },
  modules: {
    moduleA,
    moduleB
  }
})
2
3
4
5
6
7
8
9
10
11
12
13
14
15
16
17
18
19
20
21
22
23
像這樣,我們就可以將 store 拆分為 moduleA 與 moduleB 兩個模組。
到了 Vue 元件時,我們可以透過 mapState 搭配函式來取得 state.modelA 的資料:
computed: {
  ...mapState({
    productA: (state) => state.modelA.product,
    productB: (state) => state.modelB.product,
  }),
},
2
3
4
5
6
這時候 productA 拿到的資料就是 modelA 的 state.product 。
當然除了 mapState 以外, mapGetters 、 mapMutations 、 mapActions 都是一樣作法。
# rootState
當我們透過 modules 切分模組後,若我們想在模組裡面存取外層 store 的資料時,該怎麼做呢?
此時我們就需要透過 rootState 來處理:
const moduleA = {
  state: () => ({ ... }),
  getters: {
    sumWithRootCount (state, getters, rootState, rootGetters) {
      return state.count + rootState.count
    }
  },
  mutations: {
    increment(state, payload) {
      // 略...
    }
  },
  actions: {
    // ES6 物件解構,意義同 const { state, commit, rootState } = context;
    incrementIfOddOnRootSum ({ state, commit, rootState }) {
      if ((state.count + rootState.count) % 2 === 1) {
        commit('increment')
      }
    }
  },
};
2
3
4
5
6
7
8
9
10
11
12
13
14
15
16
17
18
19
20
21
以 getters 來說,我們需要透過第三個與第四個參數來分別取得 rootState 、 rootGetters。
而 mutations 與 actions 則是可以透過前面講過的 context 物件來存取 context.rootState,上面範例是透過物件解構的方式 rootState 從 context 分離出來。
# namespaced
另外,當不同模組各自擁有同樣名稱的 mutation 或 action 時,像這樣:
const moduleA = {
  state: () => ({ ... }),
  getters: { ... },
  mutations: { ... },
  actions: {
    fetchProductInfo () { ... }
  }
};

const moduleB = {
  state: () => ({ ... }),
  mutations: { ... },
  actions: {
    fetchProductInfo () { ...}
  }
};
2
3
4
5
6
7
8
9
10
11
12
13
14
15
16
那麼在 Vue 元件下,我們對 $store 下 dispatch,如:
this.$store.dispatch('fetchProductInfo');
讀者不妨猜猜,此時誰會被調用?
答案是:moduleA 與 moduleB 的 fetchProductInfo() 兩個都會被調用。
若我們不希望因為命名重複造成的錯誤時,就可以在 modules 加上 namespaced: true:
const moduleA = {
  namespaced: true,
  state: () => ({ ... }),
  getters: { ... },
  mutations: { ... },
  actions: {
    fetchProductInfo () { ... }
  }
};

const moduleB = {
  namespaced: true,
  state: () => ({ ... }),
  mutations: { ... },
  actions: {
    fetchProductInfo () { ...}
  }
};
2
3
4
5
6
7
8
9
10
11
12
13
14
15
16
17
18
此時,我們就可以改成
// moduleA 的 fetchProductInfo
this.$store.dispatch('moduleA/fetchProductInfo');

// moduleB 的 fetchProductInfo
this.$store.commit('moduleB/fetchProductInfo');
2
3
4
5
又或者,在採用 mapActions 或 mapMutations 的情況下:
methods: {
  ...mapActions('moduleA', ['fetchProductInfo', '...']),
  ...mapMutations('moduleB', ['updateProductInfo', '...']),
},
2
3
4
我們可以將 namespace 指定到 mapMutations 或 mapActions 的第一個參數中,就可以順利指定到對應的模組了。
此外,除了在 Vue 元件派發 dispatch 之外,也有可能會從模組內發送 dispatch 到 root 的情況,
這個時候,我們只需要在 dispatch 或 commit 加上第三個參數,並指定 { root: true } 就可以將 dispatch 或 commit 指定給外層的 root 了:
// dispatch for root
dispatch('someOtherAction', null, { root: true })

// commit for root
commit('someMutation', null, { root: true })
2
3
4
5