Appearance
4-2 Vue Router 路由設定
在上一個小節中,我們已經示範如何將 Vue Router 加入到專案當中, 那麼,這個小節將從 Vue Router 的路由設定檔介紹出發,並透過幾個實際的案例來示範 Vue Router 的各種功能。
小提醒
自本章節起,有關 Vue Router 的解說都會搭配 Vue CLI / webpack 來操作,請讀者多加注意。
在上一個小節最後部分曾介紹過,我們可以透過 route.js 檔案來設定 Vue Router 的路由, 而設定的選項基本上都會放在 createRouter 這個 Option 裡頭:
js
// route.js
import { createRouter, createWebHistory } from 'vue-router'
import Home from './views/Home.vue'
import About from './views/About.vue'

export const router = createRouter({
  history: createWebHistory(),
  routes: [
    { path: '/', component: Home },
    { path: '/about', component: About },
  ],
});其中最重要的就是 history 與 routes 兩個部分了。
history 路由模式
首先來講講 history,這個選項在 Vue Router v3 以前被稱為 mode, v4 開始改為 history, 指的是 Vue Router 處理前端路由的不同方式,分別是 Hash Mode 以及 HTML5 (History API) Mode 兩種。
Hash 模式
在 HTML5 的 History API 還沒出現之前,想要控制 URL 又不能換頁,只能透過 URL hash,也就是 # (井號)。 這個 Hash (#) 原本在網頁裡代表的是「錨點」的含義, # 後面接的是這個網頁的某個位置。
https://book.vue.tw/#app以上面這個網址為例,如果網頁裡面有某個節點的 id="app" 像是 <div id="app"></div> , 那麼當這個連結被開啟的同時,瀏覽器就會自動把位置捲到這個 <div id="app"></div> 的地方。
而在同一個頁面中,若只是改變了 # 後面的文字,是不會讓整個網頁重整或重新讀取的, 而且當 URL Hash 被更新時,同時也會增加一筆記錄到瀏覽器的瀏覽歷史裡,也就是說, 我們可以透過瀏覽器的「上一頁」或「下一頁」來切換不同的 # 位置,而且也不會引發頁面的重新讀取。
於是當時的人們就利用 Ajax 搭配 hashchange 事件,去監聽 URL Hash 的狀態來決定目前顯示的內容, 這算是最早的前端路由解決方案。
在 Vue Router 裡頭,我們只要將 history 設定為 createWebHashHistory() 即可開啟 Hash Mode:
js
import { createRouter, createWebHashHistory } from 'vue-router'

const router = createRouter({
  history: createWebHashHistory(),
  routes: [
    //...
  ],
})而 createWebHashHistory() 預設的路徑為 location.pathname 或 / 根目錄,若想要額外處理則可以在裡面加上路徑的字串,像是 createWebHashHistory('/folder/'),對應的就是 https://example.com/folder/# 。
Hash Mode 的好處是我們無需調整後端的設定,甚至使用 file:// 開頭的檔案協定來直接開啟網頁也能順利運作。 不過這種做法也有缺點,搜尋引擎在收錄頁面的時候,會自動忽略 URL 裡面帶有#號的部分,因此也不利於網站的 SEO。
HTML5 (History API) 模式
還好自從 HTML5 的出現,新的規範提供了 History API 的擴充,我們可以透過 pushState() 、 replaceState() 的方式更新 URL, 以及原本就有的 history.go() 、 history.back() 來指定頁面的路徑切換,同時也提供了 state 物件來讓開發者暫存與讀取每一頁的狀態。
使用方式也很簡單,我們將 history 設定為 createWebHistory() 即可開啟 HTML5 (History API) Mode:
js
import { createRouter, createWebHistory } from 'vue-router'

const router = createRouter({
  history: createWebHistory(),
  routes: [
    //...
  ],
})與 createWebHashHistory() 一樣,createWebHistory() 也允許我們在裡面加入相對路徑的字串,如 createWebHistory('/folder/') ,對應的 URL 就是 https://example.com/folder/ 。
所以,採用 HTML5 Mode 下的網址,就會像原本大家所熟悉的那樣:
https://book.vue.tw/app但就需要後端路由 (請見 4-1 小節後端路由部分) 搭配,否則當我們重新整理網頁後,就會得到一個 HTTP 404 找不到網頁的錯誤訊息。
備註
Vue Router 預設也是採取 HTML5 (History API) Mode 。
routes 路由比對
createRouter( ) 的第二個控制項是 routes,是個陣列型態的內容,用來處理路徑與 Vue 實體元件比對的設定。
以我們在 4-1 小節最後介紹的範例:
js
// route.js
import { createRouter, createWebHistory } from 'vue-router'
import Home from './views/Home.vue'
import About from './views/About.vue'

export const router = createRouter({
  history: createWebHistory(),
  routes: [
    { path: '/', component: Home },
    { path: '/about', component: About },
  ],
});我們在 routes 控制項裡面設定了 path: '/' 對應的會是 Home.vue 這個元件。 換句話說,當我們在專案 http://localhost:8080/ 的 URL 下,在 <router-view> 所顯示的就會是 Home.vue 元件的內容。
相對地,若我們在 http://localhost:8080/about 下,對應出現的就會是 About.vue 這個元件。
動態路由
在 routes 控制項裡面,除了如同前面所說一個蘿蔔一個坑之外,Vue Router 也提供了類似後端路由的功能,透過 URL 的動態路徑來讓不同的 URL 路徑都能指向同一個 Vue 元件實體。
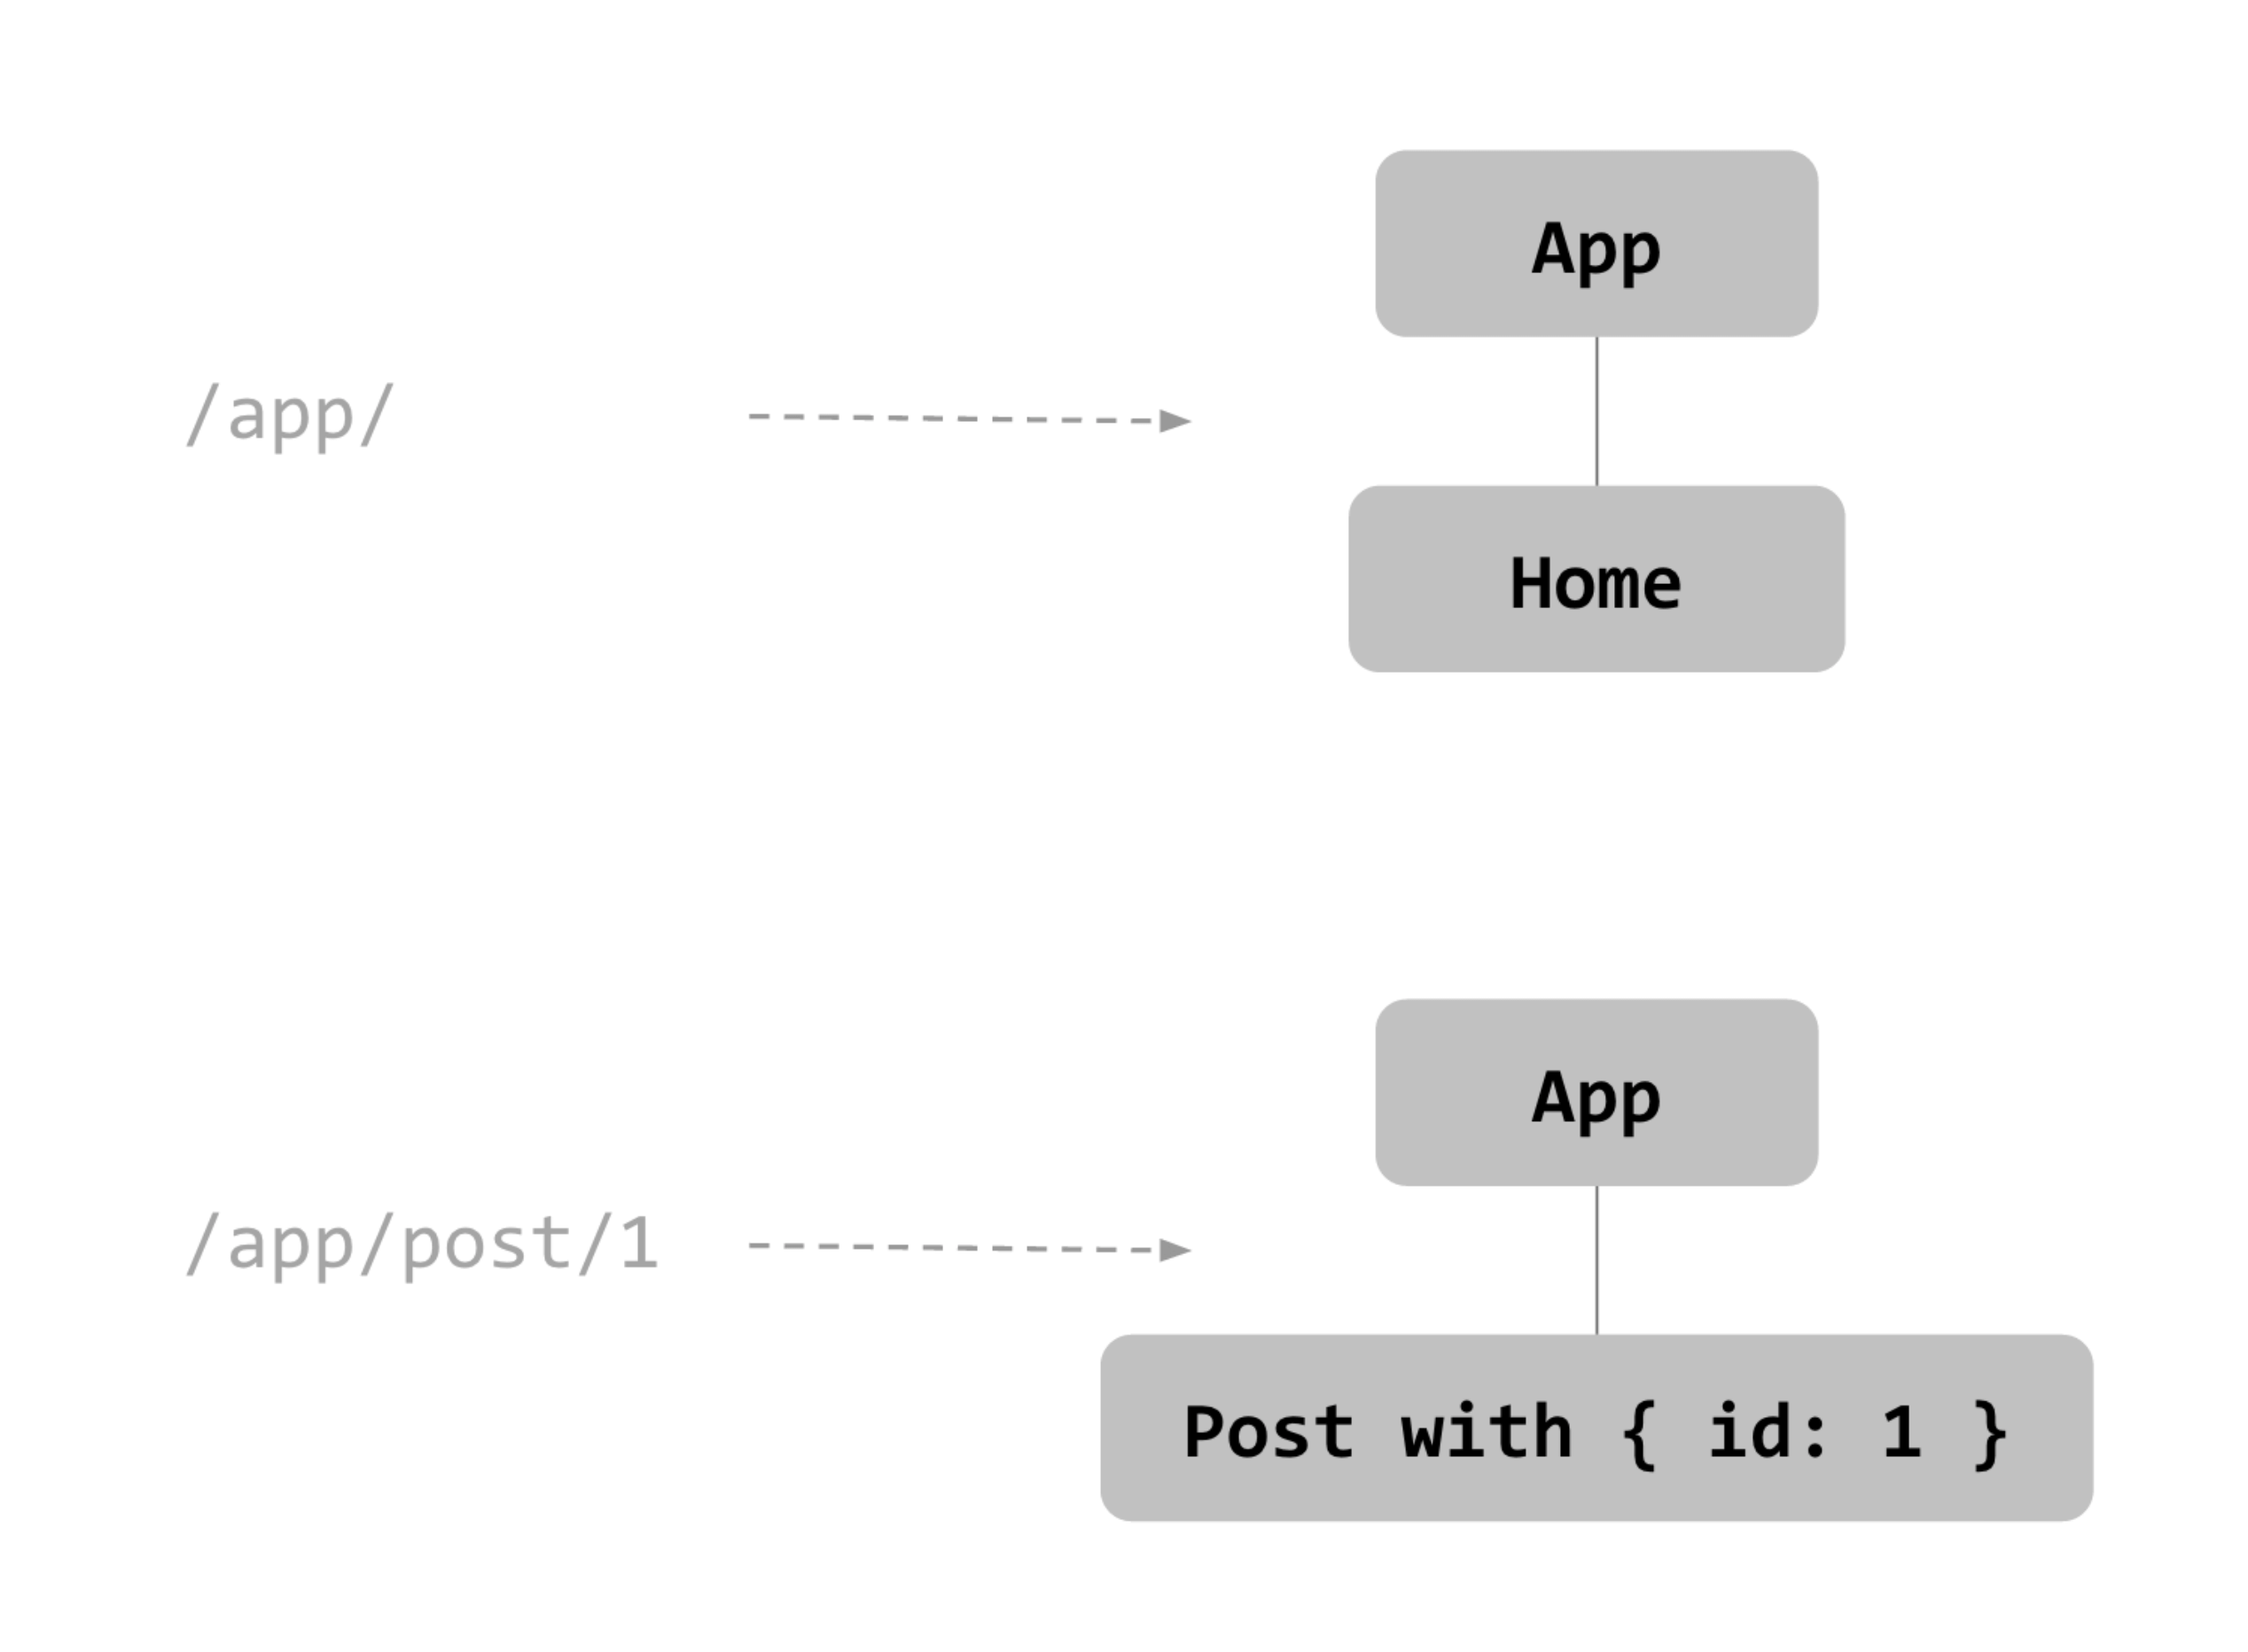
這裏我們使用在本書 2-5 小節曾經介紹過的 jsonplaceholder 來作為 API 的提供者。
首先,我們在 app.vue 裡面建立 <router-link> 與 <router-view>, 並透過 v-for 生成 /users/1 ~ /users/5 五個連結:
vue
<template>
  <ul>
    <li v-for="i in 5" :key="i">
      <router-link :to="`/users/${i}`"> /users/{{ i }} </router-link>
    </li>
  </ul>

  <router-view></router-view>
</template>再來是 Vue Router 的 route.js 設定檔,我們 routes 選項裡設定 path: "/users/:userId" 以便將 userId 傳入 User 元件,這樣 User 元件才能透過 this.$route.params.userId 順利取得網址的參數:
js
// route.js
import { createRouter, createWebHistory } from "vue-router";
import User from "./views/User.vue";

export const router = createRouter({
  history: createWebHistory(),
  routes: [{ path: "/users/:userId", component: User }]
});path 裡面的 :userId 表示 URL 中 /users/ 後面的數值會被傳入 userId,而對應的 component 則是 User.vue。
最後來處理 User 元件 views/User.vue。 由於 routes 已經設定好了,所以在裡面我們可以透過 this.$route.params.userId 來取得網址的 userId:
vue
<template>
  <h1>UserID: {{ $route.params.userId }}</h1>

  <pre>{{ userInfo }}</pre>
</template>

<script>
export default {
  data() {
    return {
      userInfo: {},
    };
  },
  computed: {
    userId() {
      // 假設 URL 為 /users/1, $route.params.userId 的值就是 1
      return this.$route.params.userId;
    },
  },
  watch: {
    userId: async function (val) {
      this.userInfo = await this.fetchUserInfo(val);
    },
  },
  methods: {
    async fetchUserInfo(id) {
      return await fetch("https://jsonplaceholder.typicode.com/users/" + id)
        .then((response) => response.json())
        .then((json) => json);
    },
  },
  async created() {
    this.userInfo = await this.fetchUserInfo(this.userId);
  },
};
</script>注意,當我們使用動態路由切換頁面在同一個元件上,這個元件並不會被銷毀再重新載入,所以上面的例子中我們使用 watch 來監測 this.$route.params.userId 也就是 this.userId 的更新,並再次透過 this.fetchUserInfo 取得新資料渲染至頁面上。
當使用者點擊 /users/1 ~ /users/5 任何一個連結時,都會對應到 User.vue 元件,並且呼叫 this.fetchUserInfo() 並顯示對應的使用者資訊了。
除了上面說的 watch 監控 $route.params.userId 的更新之外,也可以利用 Vue Router 的 beforeRouteUpdate Hook 來取得 URL 變更前/後的頁面/元件資訊:
js
async created() {
  this.userInfo = await this.fetchUserInfo(this.userId);
},
async beforeRouteUpdate(to, from) {
  console.log(to, from);
},備註
關於 beforeRouteUpdate 與其他 Hooks 的細節,後面介紹 「Navigation Guards」 時還會有詳細解說。
而 $route 與 to / from 物件內提供的資訊分別有:
js
{
  fullPath,
  hash,
  matched,
  meta,
  name,
  params,
  path,
  query
}$route 物件除了提供 $route.params 讓開發者可存取自行定義的變數名稱外 (如範例中的 userId) ,另外也提供 $route.query 、 $route.hash 以及 $route.path 等屬性來對應 URL 的 location.search、location.hash 與 location.pathname 等資訊。
自訂路由參數格式
另外,我們也可以在 path 裡面透過正規表達式 (regexp) 指定 param 裡面的格式,
js
const routes = [
  // /:orderId -> matches only numbers
  { path: '/:orderId(\\d+)' },
  // /:productName -> matches anything else
  { path: '/:productName' },
]像上面的範例, /:orderId 對應的內容就只能是數字,而 /:productName 則是沒有任何限制。
路由比對失敗 (找不到網頁)
另外,當使用者嘗試透過不存在的 URL 進行讀取時,我們也可以透過 '/:pathMatch(.*)*' 來指定「所有的」路由都會連到此元件:
js
const routes = [
  // will match everything and put it under `$route.params.pathMatch`
  { path: '/:pathMatch(.*)*', name: 'NotFound', component: NotFound },
]這樣就可以確保使用者嘗試進入不在規則內的 URL 都被轉導至 NotFound 元件。
不過需要注意的是,含有星號 * 的路由應該要放在所有規則的最後,以免原本正確的 URL 還沒配對到就被 NotFound 的規則轉走了。
非強制的路由參數
除了前面介紹的幾種規則外,我們也可以透過 ? 問號來指定當某個 param 可以是有,也可以沒有的比對情況:
js
const routes = [
  // will match /users and /users/posva
  { path: '/users/:userId?' },
  // will match /users and /users/42
  { path: '/users/:userId(\\d+)?' },
]像這樣,我們在 :userId 後面加個 ?,就表示當 URL 為 /users 或者 /users/xxx 的時候, 都會被帶到這個路由所指定的元件中。
巢狀路由
Vue Router 也允許我們在 <router-view> 渲染的元件內,再放一層 <router-view>,這樣的做法就被稱為「巢狀路由」 (nested routes),或稱「嵌套路由」。
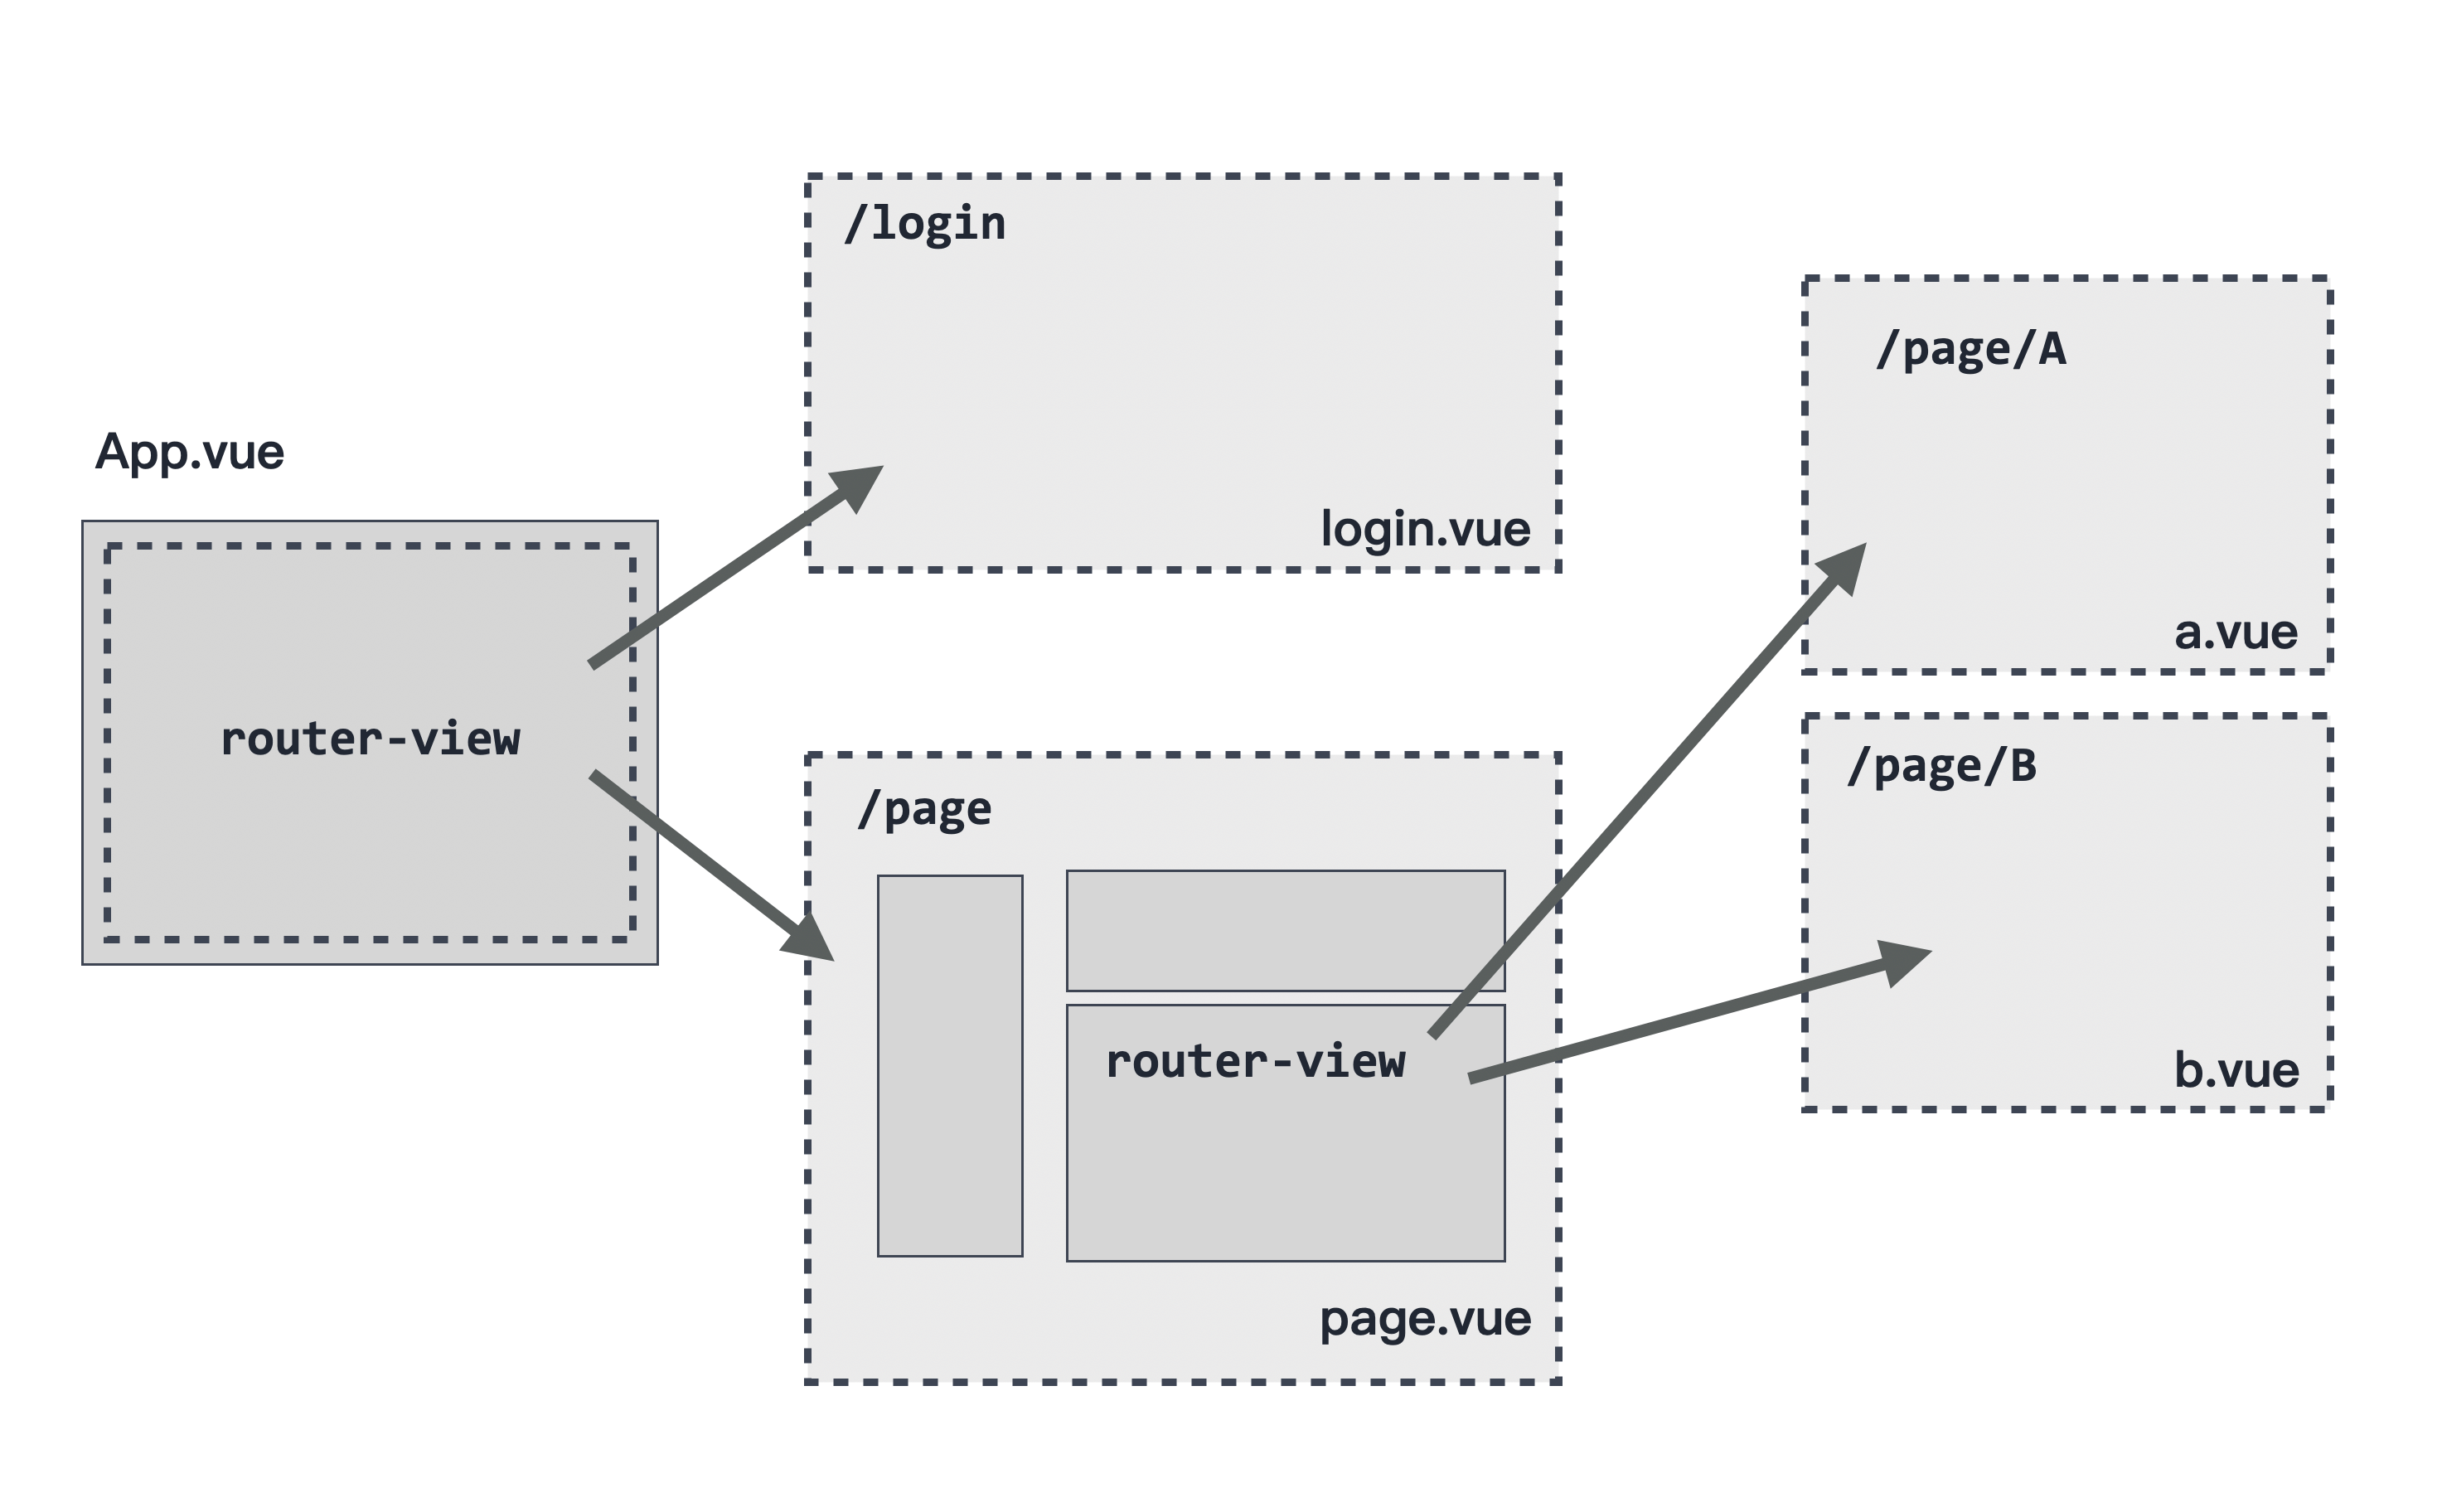
以前一個範例繼續延伸,我們修改 User.vue 並在模板內新增一個 <router-link> 把目標指向 /users/${userId}/posts, 並新增一組 <router-view> 用來顯示目前 User 的所有文章列表:
vue
<!-- User.vue -->
<template>
  <h1>User: {{ userId }} - {{ userInfo?.name }}</h1>
  <div>username: @{{ userInfo.username }}</div>
  <div>email: {{ userInfo.email }}</div>
  <div>phone: {{ userInfo.phone }}</div>
  <hr />

  Show
  <router-link :to="`/users/${userId}/posts`">
    /users/{{ userId }}/posts
  </router-link>

  <hr />
  <!-- 等等要給 Post.vue 的位置 -->
  <router-view></router-view>
</template>然後新增一個 Post.vue,同樣在 created 階段透過 fetch 取得遠端的 posts 列表,並顯示在模板中:
vue
<!-- Post.vue -->
<template>
  <h1>Post from User-{{ userId }}</h1>
  <ol>
    <li v-for="post in posts" :key="post.id">
      <h3>{{ post.title }}</h3>
      <p>{{ post.body }}</p>
    </li>
  </ol>
</template>

<script>
export default {
  data() {
    return {
      posts: [],
    };
  },
  computed: {
    userId() {
      // 取得網址路由提供的 userId
      return this.$route.params.userId;
    },
  },
  methods: {
    // api: 取得指定 user 的 post 列表
    async fetchUserPosts(id) {
      return await fetch(
        "https://jsonplaceholder.typicode.com/posts?userId=" + this.userId
      ).then((response) => response.json());
    },
  },
  async created() {
    this.posts = await this.fetchUserPosts(this.userId);
  },
};
</script>最後,調整 route.js,在原本對應 User 的 routes 增加一個 children 陣列來表示它的第二層路由:
js
// route.js
import { createRouter, createWebHistory } from "vue-router";
import User from "./views/User.vue";
import Post from "./views/Post.vue";

export const router = createRouter({
  history: createWebHistory(),
  routes: [{
    path: "/users/:userId",
    component: User,
    children: [
      {
        // /user/:id/posts - 取得指定 User 的 post 內容
        path: 'posts',
        component: Post,
      },
    ]
  }]
});小提醒
小心 children 裡面的 path 不要加上 / 開頭,否則會被帶回根目錄。
假設我們在網址列 http://localhost:8080/users/1/ 就可以看到 1 號使用者的資訊, 點一下下方的 「 Show /users/1/posts 」 之後,你會發現網址此時變成 http://localhost:8080/users/1/posts, 而且在下方我們剛剛新增 <router-view> 的位置會顯示 1 號使用者所有的貼文列表:
像這樣,我們可以在 <router-view> 內的元件再套層 <router-view> 來達到頁面元件可以依照路由顯示鑲嵌套層的效果, 這就是 Vue Router 巢狀路由的威力。
具名路由
在 routes 物件內,除了 path 之外,我們也可以指定 name 來作為元件的路由參考:
js
routes: [
  { path: '/', name: 'home', component: Home },
  { path: '/foo', name: 'foo', component: Foo },
  { path: '/bar/:id', name: 'bar', component: Bar }
]如果我們希望新增 <a> 連結,並分別指向這個路由時,我們可以為目標新增 <router-link>,然後將 to 指定給這個目標:
html
<ul>
  <li><router-link :to="{ name: 'home' }">home</router-link></li>
  <li><router-link :to="{ name: 'foo' }">foo</router-link></li>
  <li><router-link :to="{ name: 'bar', params: { id: 123 }}">bar</router-link></li>
</ul>像上面這樣,對應的 URL 結果就會是 / 、 /foo 以及 /bar/123 了。
具名視圖
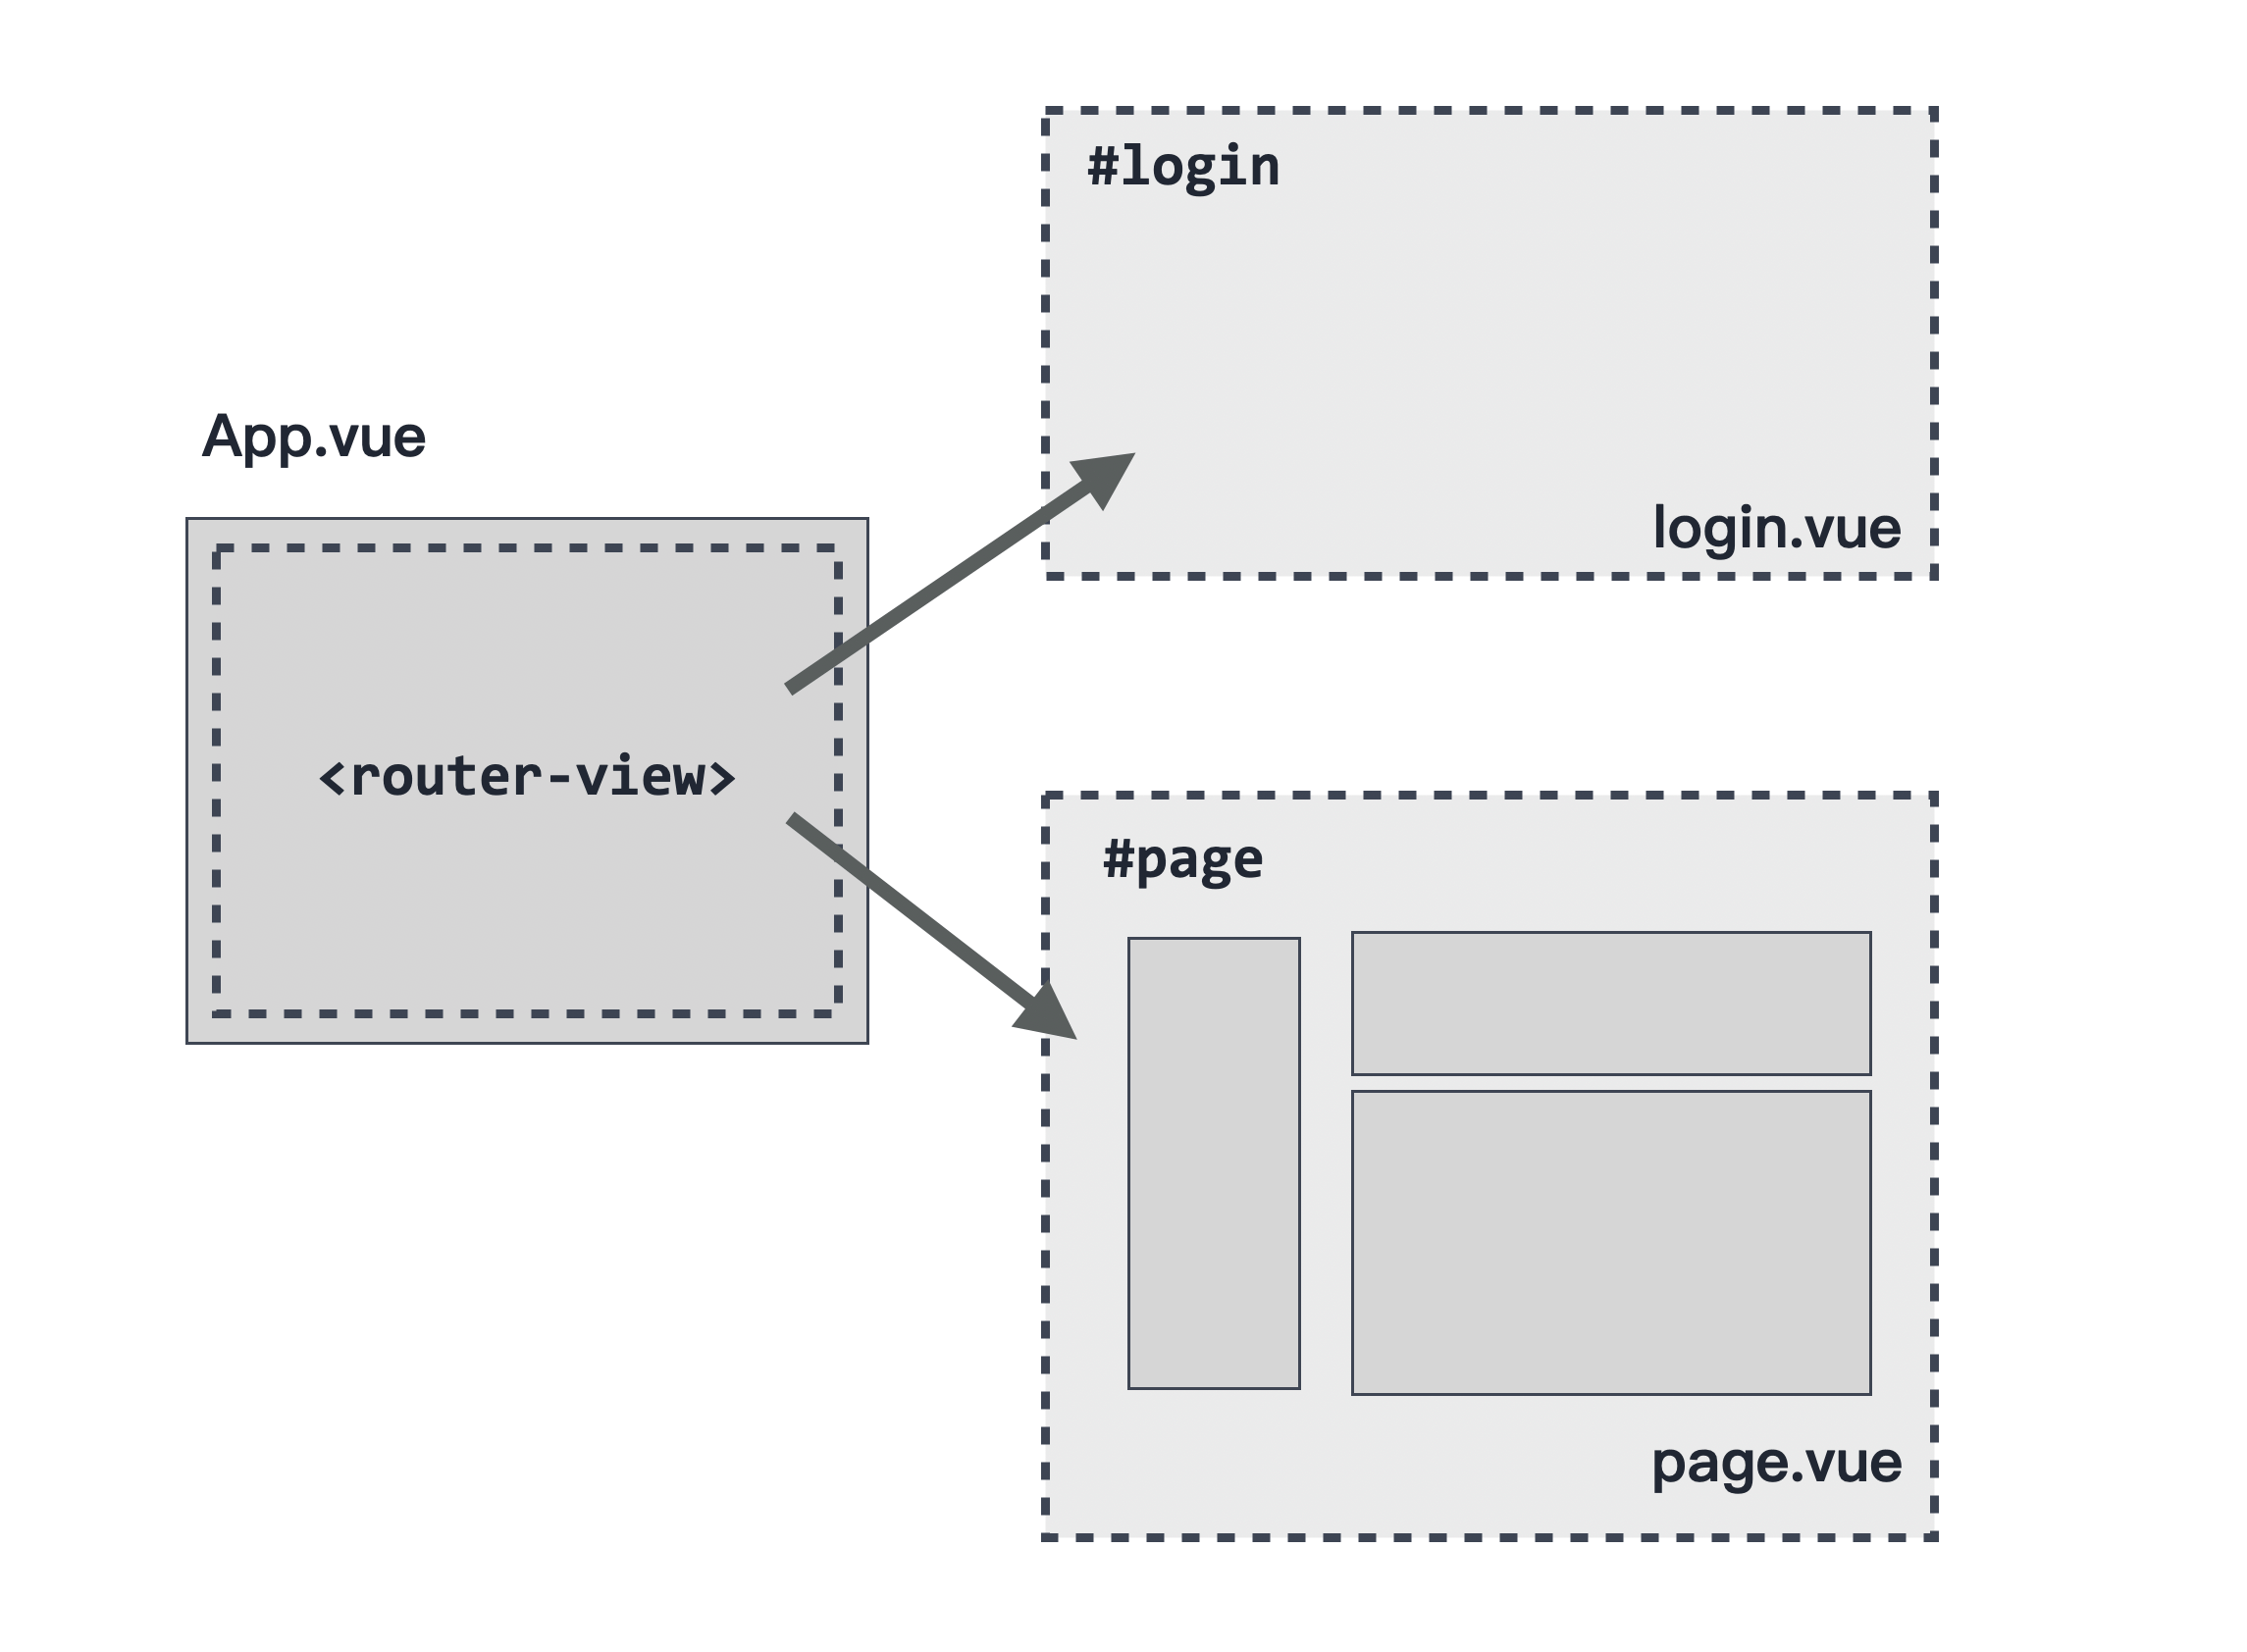
在 routes 物件內除了 path 可以取名之外,對應的 <router-view> 也可以幫它命名, 如果我們一個網頁裡面同時包含多個 <router-view> 的時候,就是一個很好用的功能。
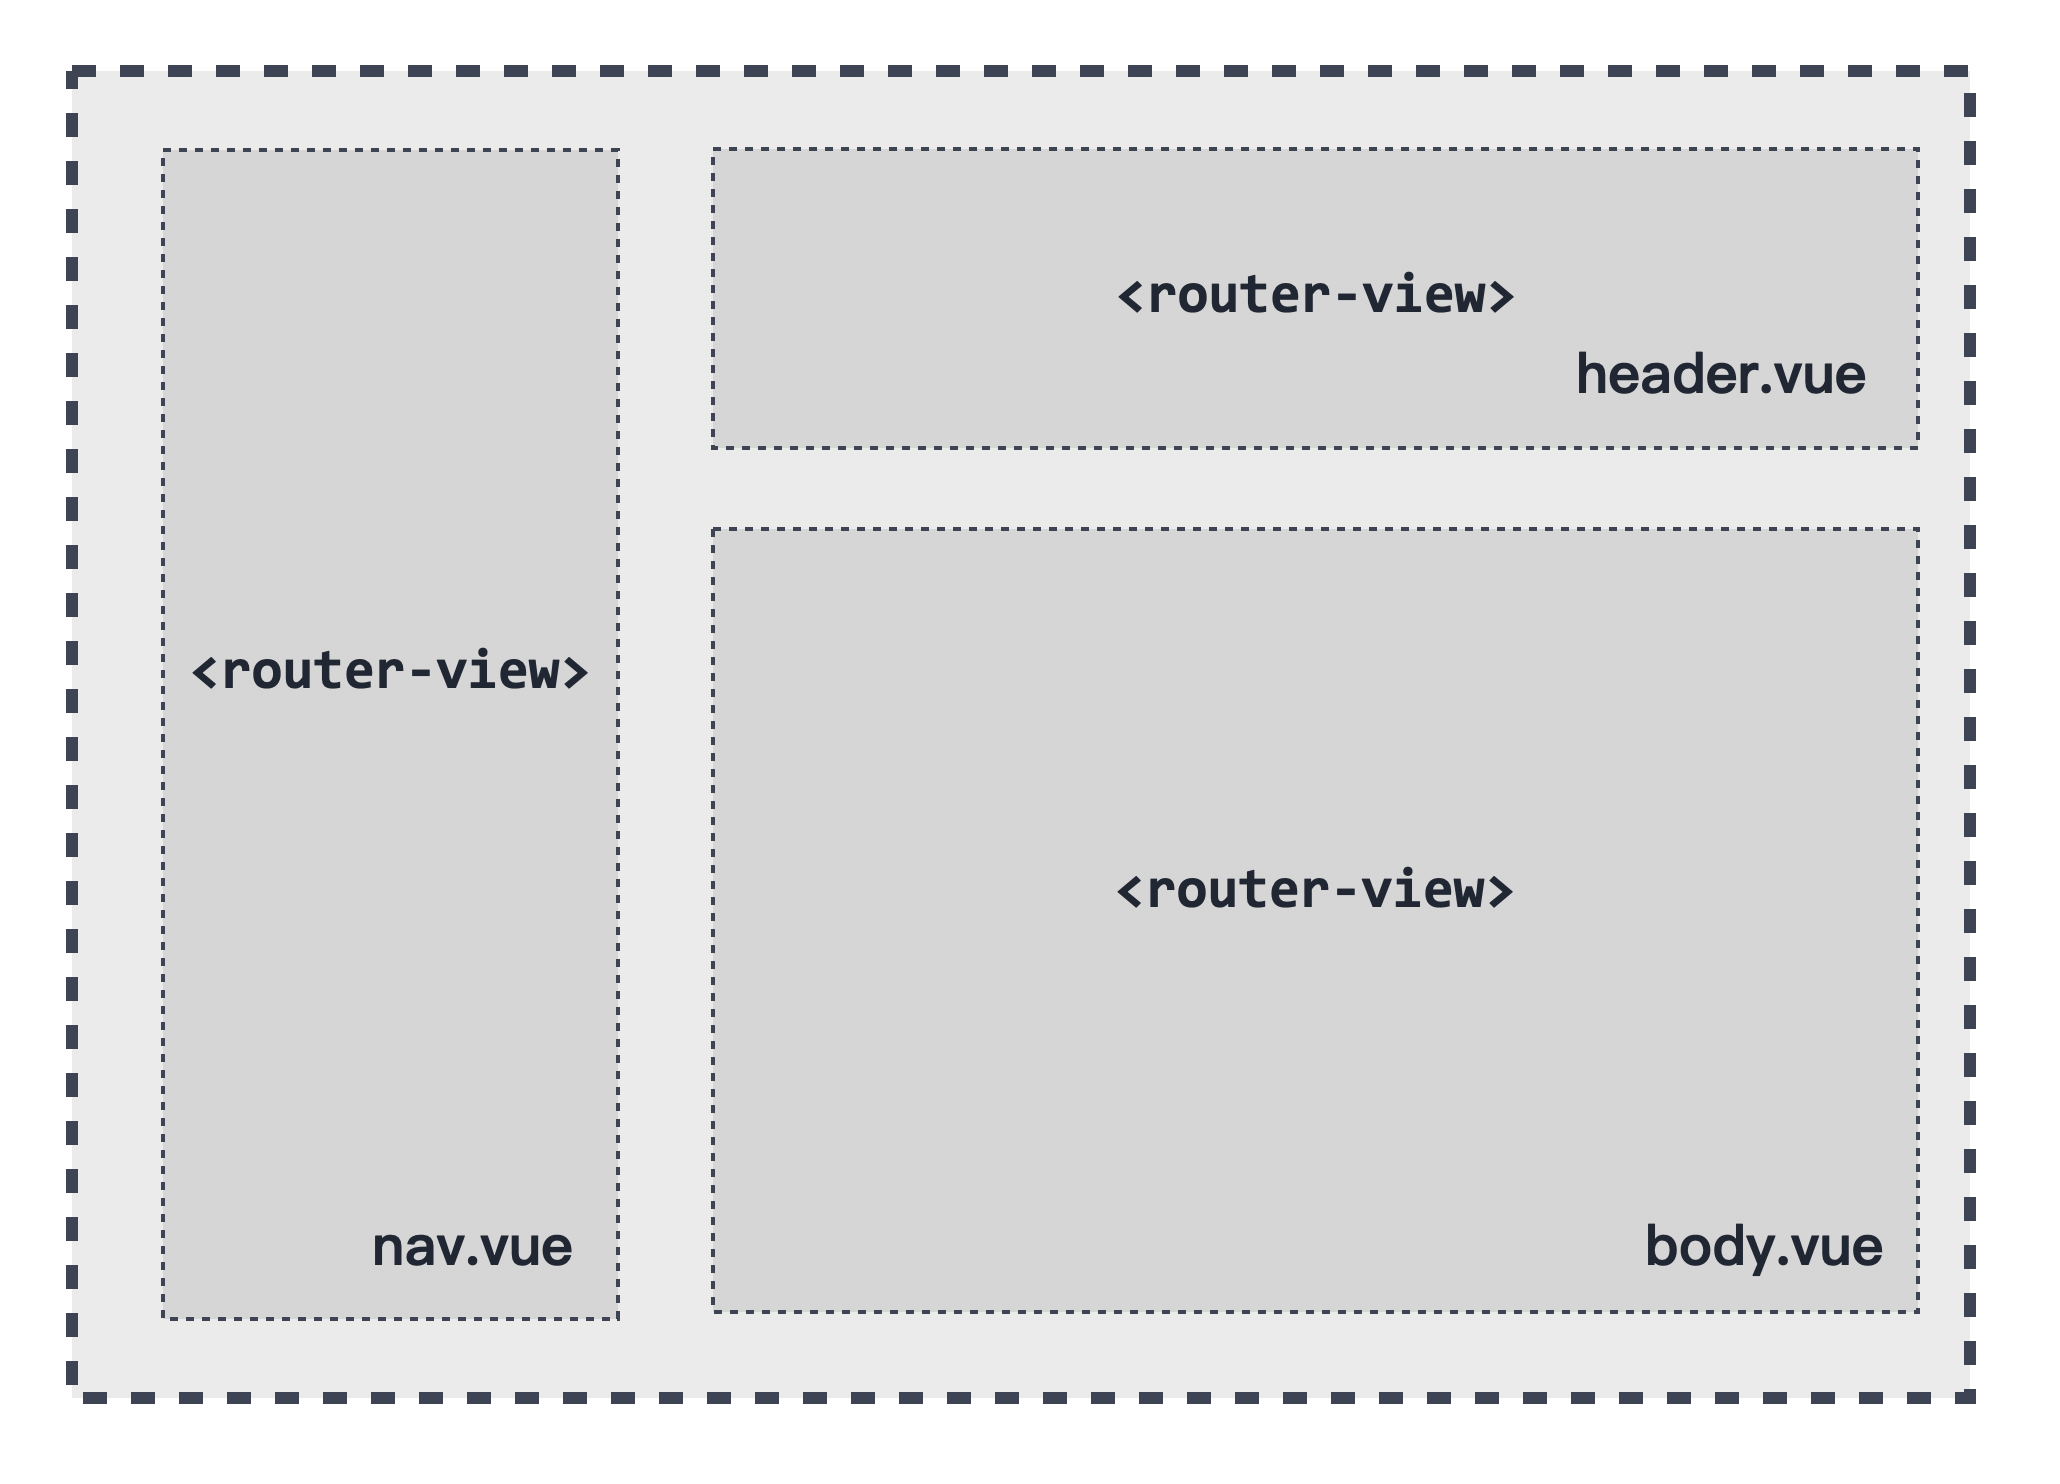
像這樣,假設我們的 / 同時包含了三組 <router-view>,這個時候我們就可以為 <router-view> 加上 name 屬性:
html
<router-view class="view nav-block" name="Nav"></router-view>
<router-view class="view header-block" name="Header"></router-view>
<router-view class="view body-block"></router-view>這時候,我們需要在 routes 加上 components 來指定每一個 <router-view> 所對應的 Vue 元件:
js
import Body from './body.vue';
import Header from './header.vue';
import Nav from './nav.vue';

// components 的 s 不要忘記了!
const routes = [
  {
    path: '/',
    components: {
      // 沒有設定 `name` 的 <router-view> 我們可以透過 default 指定給它。
      default: Body,
      Header: Header,
      Nav: Nav,
    },
  },
];像這樣,這三個 <router-view> 就可以正確渲染出對應的元件內容了。
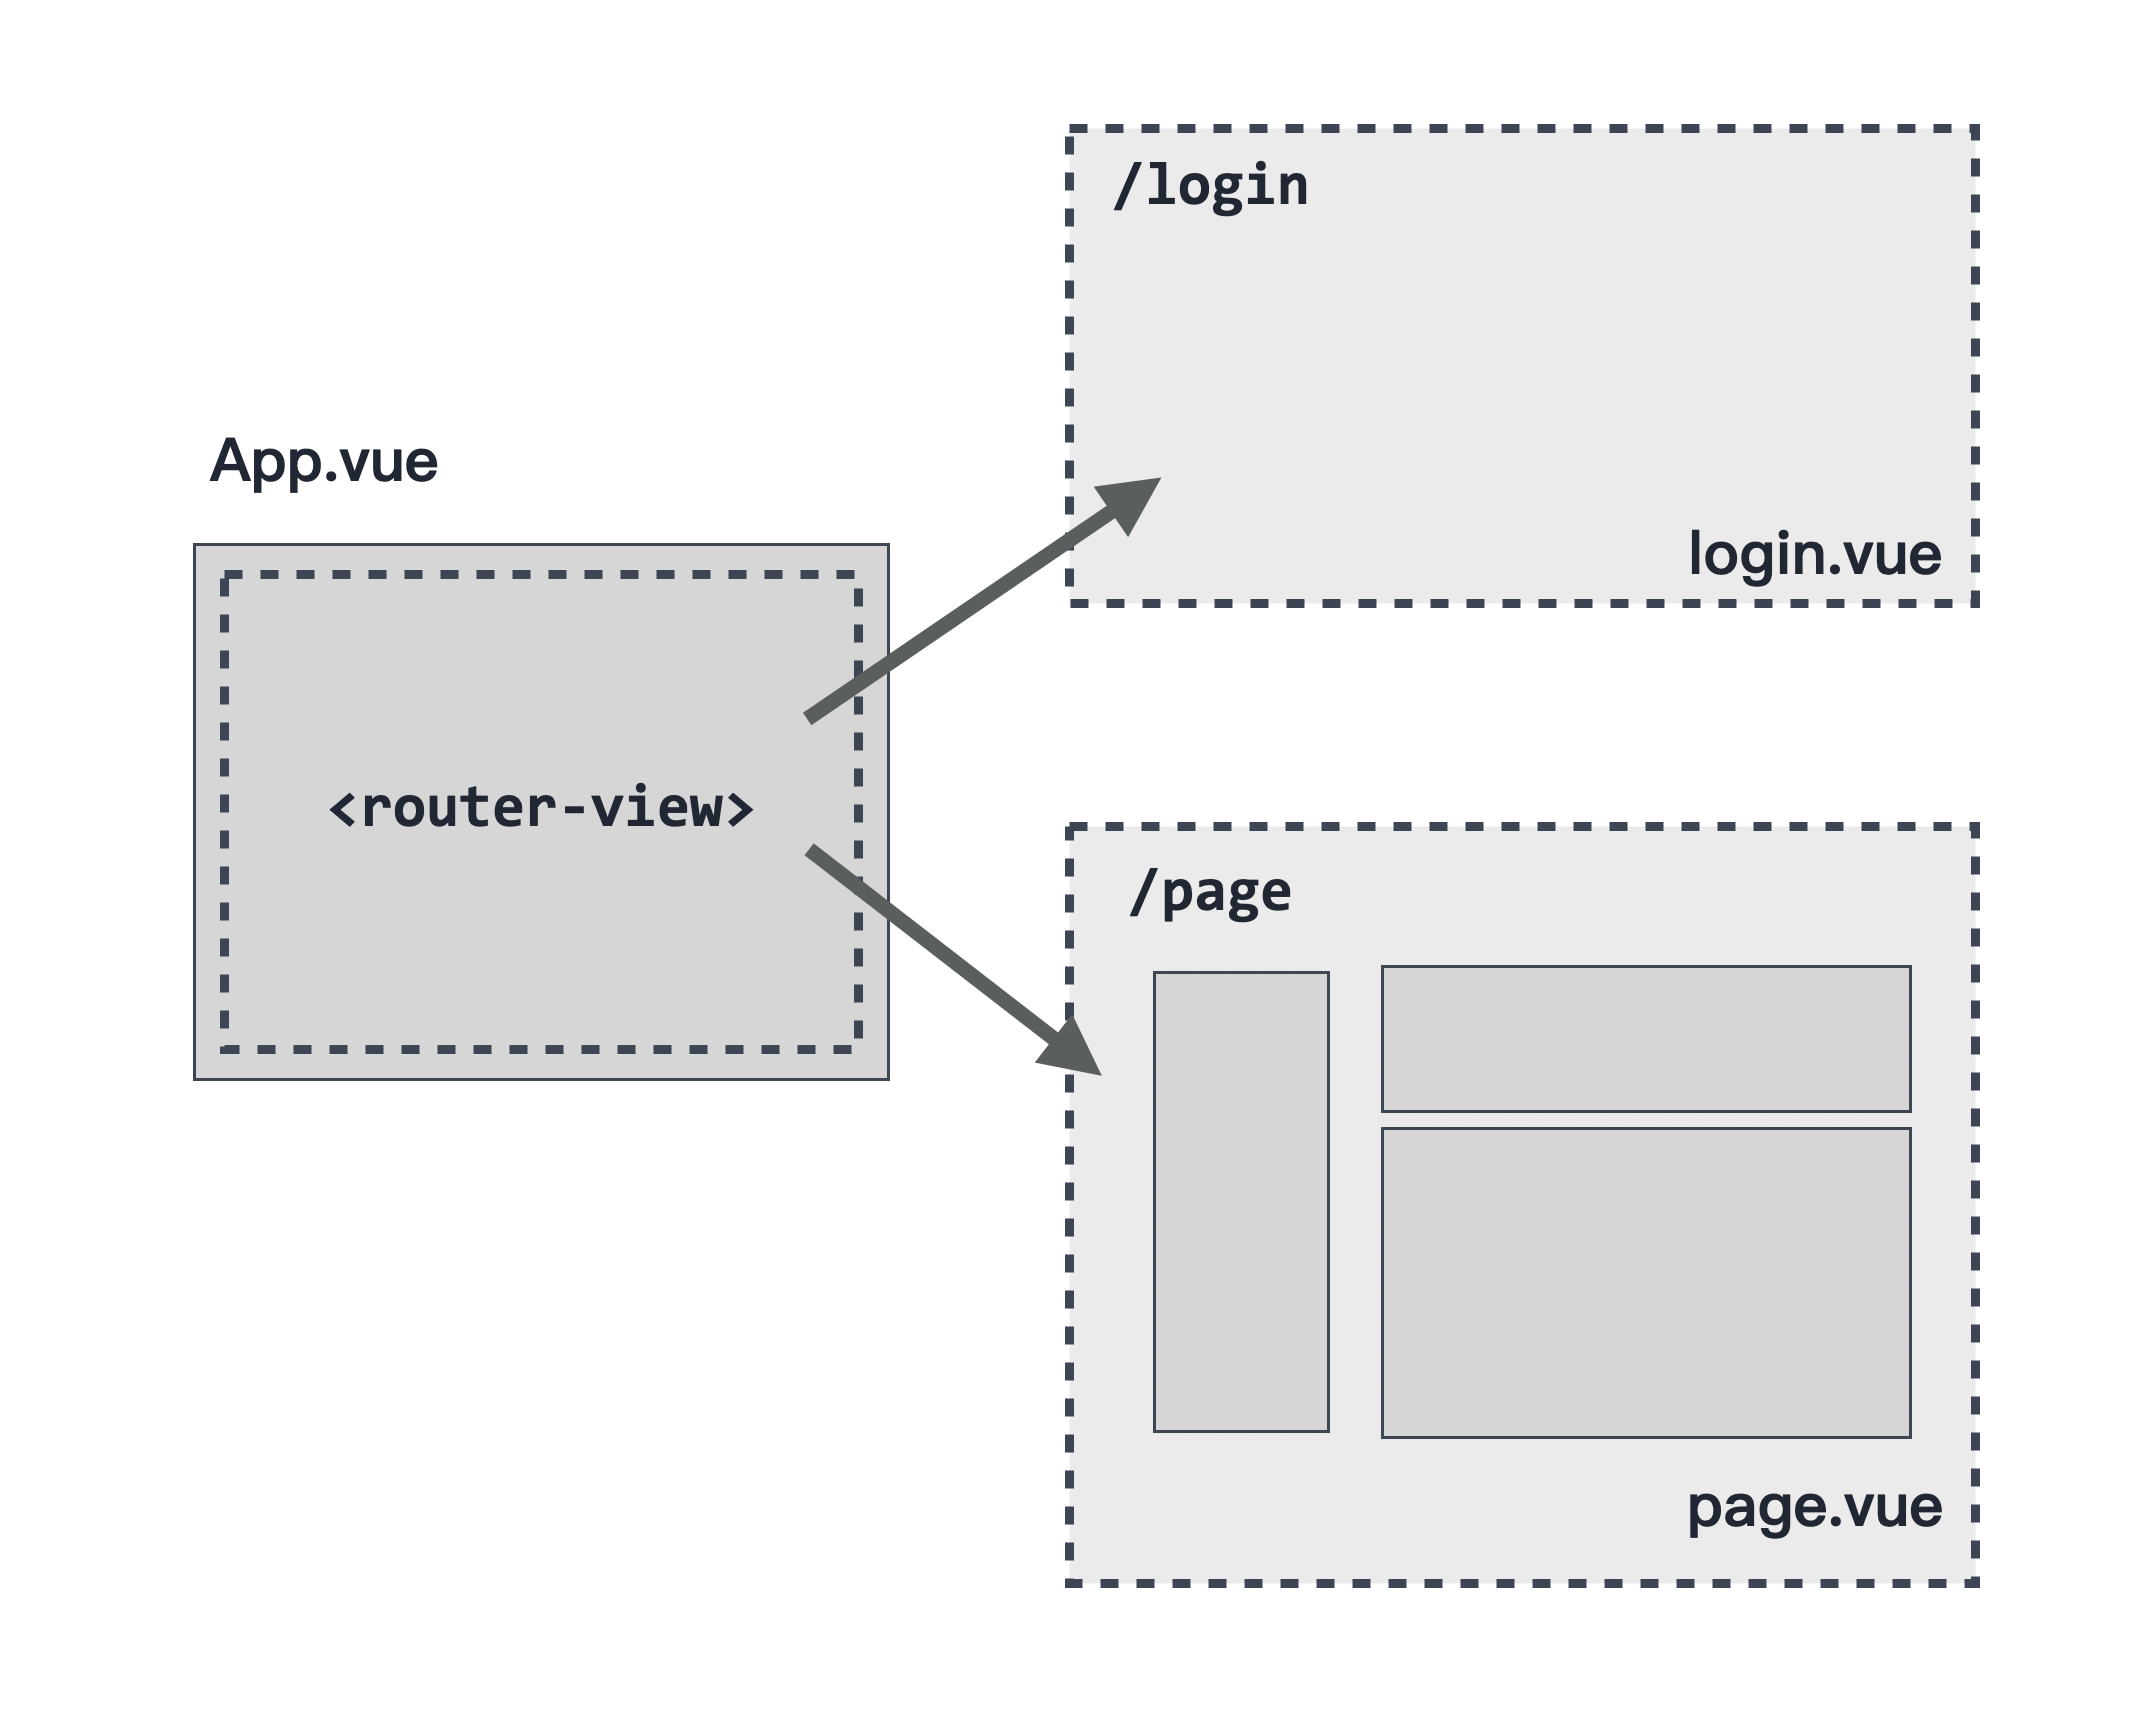
巢狀具名視圖
實際開發中,除了首層會有多個 <router-view> 的情況,在子層級的元件也有可能出現多個 <router-view>,像這樣:
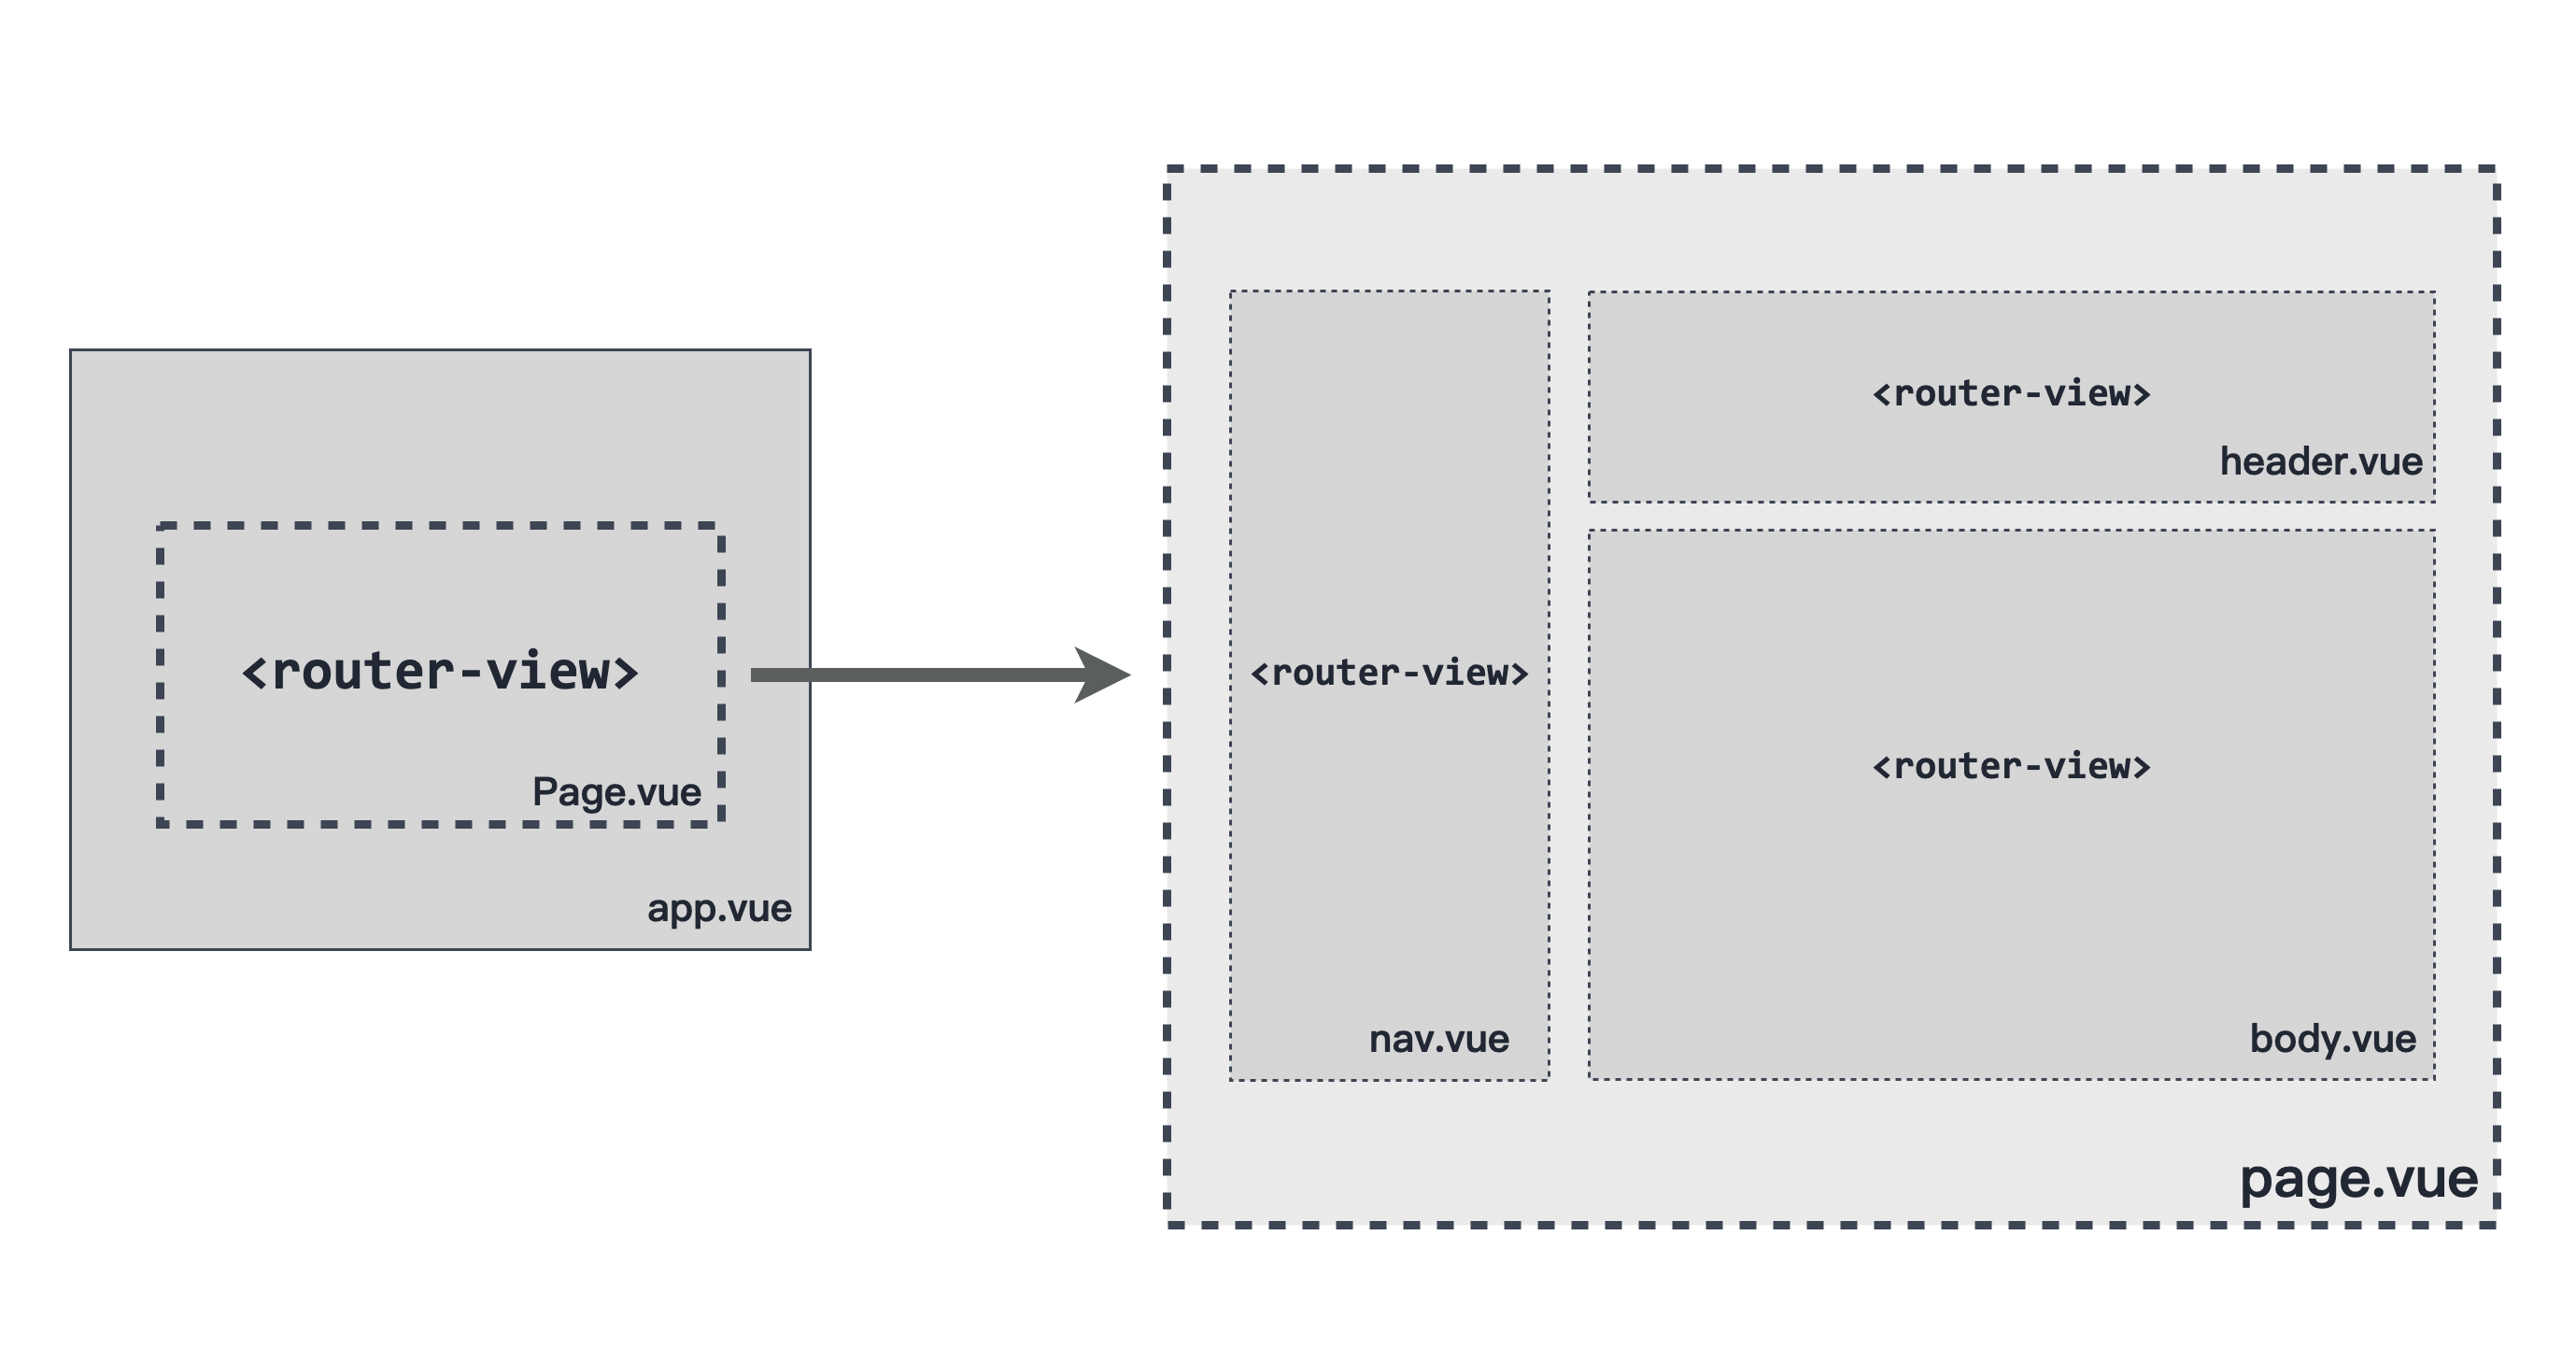
Page.vue 的模板結構基本上跟前一個範例差別不大:
html
<!-- Page.vue -->
<div>
  <router-view class="view nav-block" name="Nav"></router-view>
  <router-view class="view header-block" name="Header"></router-view>
  <router-view class="view body-block"></router-view>
</div>在 routes 的設定中,將 components 屬性指定於 children 之下:
js
import Page from './page.vue';
import Body from './body.vue';
import Header from './header.vue';
import Nav from './nav.vue';

const routes = [
  {
    path: '/pages',
    component: Page,
    children: [
      components: {
        default: Body,
        Header: Header,
        Nav: Nav,
      },
    ]
  }
];在使用上沒有太大的不同,唯一要注意的是 component 與 components 的差異。
路由轉址
在 routes 裡面,除了透過 path 之外,我們也可以加上 redirect 選項來指定某個路由要轉址到某個目標。
例如我們可以直接在 redirect 加上路徑像是 /,這時就會將 /home 轉頁到 '/' 的位置。
js
const routes = [
  { path: '/home', redirect: '/' }
]當然也可以透過 name 來指定轉頁的目標,像:
js
const routes = [
  { path: '/app', redirect: { name: 'appPage' } }
]除了直接指定 URL 與 name 之外, redirect 也允許我們透過 function 的形式來指定目標:
js
const routes = [
  {
    // /search/screens -> /search?q=screens
    path: '/search/:searchText',
    redirect: to => {
      // the function receives the target route as the argument
      // we return a redirect path/location here.
      return { path: '/search', query: { q: to.params.searchText } }
    },
  },
  {
    path: '/search',
    // ...
  },
]像這樣,我們就可以將 /search/screens 轉址為 /search?q=screens,使原本的 URL path 變成 query string 的一部分。
小提醒
若在 routes 裡面加上 redirect 選項時,原本的 component 可以被省略,因為當頁面被轉走就永遠看不到這個 component 了。 而唯一的例外是前面講過的「巢狀路由」,若此路由規則同時有 children 與 redirect 屬性,則必定要有 component 屬性來處理承接 <router-view> 元件。
路由別名
與 redirect 轉址類似,路由別名 alias 雖然也能讓使用者在 /home 看到 / ,也就是 Homepage 的內容,如:
js
const routes = [
  { path: '/', component: Homepage, alias: '/home' }
]但這個 alias: '/home' 表示當使用者透過 /home 瀏覽網頁時,雖然看到的跟 / 一樣的畫面, 但 URL 仍保持在 /home 下,不會被強制轉到 /。
而在 redirect 的情況下, URL 會被轉到 / 的位置。
當然我們也可以同時指定多個別名:
js
const routes = [
  {
    path: '/users',
    component: UsersLayout,
    children: [
      // this will render the UserList for these 3 URLs
      // - /users
      // - /users/list
      // - /people
      { path: '', component: UserList, alias: ['/people', 'list'] },
    ],
  },
]像這樣,透過 children 與陣列的方式,我們可以同時指定 /users 、 /users/list 以及 /people 所渲染的畫面結果是同樣的。
如果要在別名路由加上參數,則是要記得在 path 與 alias 保持一致:
js
const routes = [
  {
    path: '/users/:id',
    component: UsersByIdLayout,
    children: [
      // this will render the UserDetails for these 3 URLs
      // - /users/24
      // - /users/24/profile
      // - /24
      { path: 'profile', component: UserDetails, alias: ['/:id', ''] },
    ],
  },
]像這樣,當 URL 為 /users/24 、 /users/24/profile 以及 /24 就都會渲染相同結果了。
路由與 Props
由於 Vue Router 的路由與元件緊密耦合,對元件來說就無法彈性地重複使用,像是:
js
// component
const User = {
  template: '<div>User {{ $route.params.id }}</div>'
}

// routes
const routes = [{ path: '/user/:id', component: User }]像上面這個 User 元件,由於直接在模板內使用 $route.params.id, 這表示若是元件脫離了 Vue Router 就無法單獨使用,這就失去了我們希望抽離元件希望達到高度重複使用的目的。
而 Vue Router 允許我們將 $route.params 視為 Props 來使用:
js
// component
const User = {
  props: ['id'],
  template: '<div>User {{ id }}</div>'
}

// routes
const routes = [{ path: '/user/:id', component: User, props: true }]像這樣,我們只需要在 routes 加上 props 屬性,並設定為 true, 這樣就可以將 params 的 :id 當作 Props 傳入元件來使用,模板內容也會更加簡潔。
另外,如果是前面曾經提到過的具名路由,則需要逐一指定是否開啟 props 的設定:
js
const routes = [
  {
    path: '/user/:id',
    components: {
      default: User,
      sidebar: Sidebar
    },
    props: {
      default: true,
      sidebar: false
    }
  }
]像這樣,元件 User 被指定開啟 props 傳遞,而元件 Sidebar 則是不傳遞 props。
小提醒: props 的其他形態
Props 屬性除了前面介紹的 Boolean 之外,也可以是純物件形式:
js
// component
const Promotion = {
  props: ['newsletterPopup'],
  template: `...`
}

// routes
const routes = [
  {
    path: '/promotion/from-newsletter',
    component: Promotion,
    props: { newsletterPopup: false }
  }
]像這樣,就會將 newsletterPopup 當作一般的 props 傳遞到 Promotion 元件中。
同時,Props 也可以寫成 function 的樣式:
js
const routes = [
  {
    path: '/search',
    component: SearchUser,
    props: route => ({ query: route.query.q })
  }
]此時,若我們的 URL 為 /search?q=vue ,則會傳遞一個 { query: 'vue' } 的 props 給 SearchUser 元件。
非同步載入元件
如同第三章介紹的,當我們開發進行到最終階段時,可能會透過如 webpack 等工具來進行打包, 如果我們能將不同的元件在打包時分開成為獨立的模組,並且在需要的時候才將它們載入,像是進入指定的路由才去讀取, 這時我們就可以利用 Vue Router 所內建的功能:
js
const routes = [
  {
    path: '/',
    name: 'Home',
    component: Home
  },
  {
    path: '/about',
    name: 'About',
    // route level code-splitting
    // this generates a separate chunk (about.[hash].js) for this route
    // which is lazy-loaded when the route is visited.
    component: () => import(/* webpackChunkName: "about" */ '../views/About.vue')
  }
]我們只需要在 component 屬性透過 import 語法來引入到路由中, 這樣一來無論是打包或者是網站實際執行時,都可以獲得類似 lazy-loading 也就是需要的時候才去載入的效果, 當網站的規模越大,對於整體的效能就會有越大的幫助。