Appearance
事件處理與表單綁定
畫面能顯示資料之後,下一步就是讓使用者操作畫面。Vue 的事件處理用 v-on,常見縮寫是 @;表單資料同步則用 v-model。這一節從 DOM 事件與原生表單元素開始。
監聽事件
v-on 的完整寫法,是在冒號後面接上要監聽的事件名稱:
html
<元素 v-on:事件名稱="要執行的表達式">v-on: 可以縮寫成 @,因此同一條指令也可以寫成:
html
<元素 @事件名稱="要執行的表達式">這裡的「事件名稱」不是固定寫成 event,而是換成瀏覽器實際提供的 DOM 事件。例如:
| 監聽時機 | 完整寫法 | 縮寫 |
|---|---|---|
| 使用者點擊 | v-on:click="increment" | @click="increment" |
| 使用者放開按鍵 | v-on:keyup="recordKey" | @keyup="recordKey" |
| 表單送出 | v-on:submit="submit" | @submit="submit" |
兩種寫法的功能完全相同;實務上通常使用較簡潔的 @。接著來看最基本的 @click,讓它在按鈕被點擊時執行函式:
vue
<script setup>
import { ref } from 'vue'

const count = ref(0)

function increment() {
  count.value++
}
</script>

<template>
  <main class="app">
    <p>目前點擊次數:{{ count }}</p>
    <button type="button" @click="increment">
      點我
    </button>
  </main>
</template>

<style scoped>
.app {
  padding: 2rem;
}
</style>@click="increment" 是 v-on:click="increment" 的縮寫,意思是:當按鈕被點擊時,呼叫 increment()。注意模板中寫函式名稱即可,除非要傳入參數,否則不必加上括號。
傳入事件物件與參數
如果需要取得原生事件物件,可以直接接收參數:
vue
<script setup>
import { ref } from 'vue'

const lastKey = ref('')

function recordKey(event) {
  lastKey.value = event.key
}
</script>

<template>
  <main class="app">
    <input type="text" @keyup="recordKey">
    <p>最後按下的鍵:{{ lastKey }}</p>
  </main>
</template>

<style scoped>
.app {
  padding: 2rem;
}
</style>如果同時需要自訂參數與事件物件,可以使用 $event:
vue
<script setup>
import { ref } from 'vue'

const message = ref('')

function submit(source, event) {
  message.value = `${source} 送出:${event.target.value}`
}
</script>

<template>
  <main class="app">
    <input
      type="text"
      placeholder="輸入後按 Enter"
      @keyup.enter="submit('鍵盤', $event)"
    >
    <p>{{ message }}</p>
  </main>
</template>

<style scoped>
.app {
  padding: 2rem;
}
</style>事件修飾子
在原生 DOM 事件裡,我們常用 event.preventDefault() 阻止預設行為,也會用 event.stopPropagation() 擋住事件繼續往父層冒泡。Vue 把這兩種常見操作做成了 .prevent 與 .stop 修飾子:
vue
<script setup>
import { ref } from 'vue'

const submitted = ref(false)

function submit() {
  submitted.value = true
}
</script>

<template>
  <main class="app">
    <form class="form" @submit.prevent="submit">
      <button type="submit">
        送出
      </button>
    </form>

    <p v-if="submitted">表單已送出,但頁面沒有重新整理。</p>
  </main>
</template>

<style scoped>
.app {
  padding: 2rem;
}

.form {
  margin-bottom: 1rem;
}
</style>表單的預設行為是送出後重新整理(或跳轉)頁面,範例中的 @submit.prevent 阻止了這件事,所以送出後畫面上的訊息能留在原地。
常見事件修飾子如下:
| 修飾子 | 用途 |
|---|---|
.prevent | 呼叫 event.preventDefault(),阻止元素的預設行為(如表單送出後重新整理頁面)。 |
.stop | 呼叫 event.stopPropagation(),阻止事件往外層元素冒泡。 |
.once | 事件只觸發一次。 |
.self | 只有事件來自元素本身時才觸發。 |
按鍵修飾子
鍵盤事件可以搭配按鍵修飾子,讓模板更接近需求本身:
vue
<script setup>
import { ref } from 'vue'

const keyword = ref('')
const searched = ref('')

function search() {
  searched.value = keyword.value
}
</script>

<template>
  <main class="app">
    <input
      v-model="keyword"
      type="search"
      placeholder="輸入關鍵字後按 Enter"
      @keyup.enter="search"
    >

    <p>搜尋關鍵字:{{ searched }}</p>
  </main>
</template>

<style scoped>
.app {
  padding: 2rem;
}
</style>像 .enter、.esc、.tab 這類修飾子,可以少寫一層 if (event.key === 'Enter')。
原生表單元素的 v-model
表單最常見的需求,是讓輸入值與資料保持同步。v-model 可以把這件事變得很直覺:
vue
<script setup>
import { ref } from 'vue'

const name = ref('')
</script>

<template>
  <main class="app">
    <label>
      名字
      <input v-model="name" type="text">
    </label>

    <p>你好,{{ name || '訪客' }}!</p>
  </main>
</template>

<style scoped>
.app {
  padding: 2rem;
}
</style>你好,訪客!
v-model="name" 會把輸入框的值同步到 name,也會在 name 改變時更新輸入框。對原生表單元素來說,它可以用在 input、textarea、select 等元素上。
vue
<script setup>
import { ref } from 'vue'

const note = ref('')
const level = ref('beginner')
</script>

<template>
  <main class="app">
    <label>
      學習筆記
      <textarea v-model="note"></textarea>
    </label>

    <label>
      程度
      <select v-model="level">
        <option value="beginner">初學</option>
        <option value="intermediate">有經驗</option>
        <option value="advanced">進階</option>
      </select>
    </label>

    <p>目前程度:{{ level }}</p>
    <p>筆記:{{ note }}</p>
  </main>
</template>

<style scoped>
.app {
  display: grid;
  gap: 1rem;
  padding: 2rem;
}

label {
  display: grid;
  gap: 0.5rem;
}
</style>checkbox 與 radio
v-model 遇到不同表單元素,綁定方式也不同:文字欄位跟著 value 走;單一 checkbox 代表 true 或 false;radio 則取得選取的選項的 value。這些差異 Vue 會替我們處理,不需要自己分辨。
vue
<script setup>
import { ref } from 'vue'

const subscribed = ref(false)
const plan = ref('free')
</script>

<template>
  <main class="app">
    <label>
      <input v-model="subscribed" type="checkbox">
      訂閱電子報
    </label>

    <fieldset>
      <legend>選擇方案</legend>
      <label>
        <input v-model="plan" type="radio" value="free">
        免費方案
      </label>
      <label>
        <input v-model="plan" type="radio" value="pro">
        付費方案
      </label>
    </fieldset>

    <p>{{ subscribed ? '已訂閱' : '未訂閱' }},方案:{{ plan }}</p>
  </main>
</template>

<style scoped>
.app {
  display: grid;
  gap: 1rem;
  padding: 2rem;
}
</style>未訂閱,方案:free
subscribed 是布林值,勾選與取消勾選會在 true 與 false 之間切換;plan 則永遠等於目前選取的 radio 的 value。這裡先掌握單一 checkbox;多選 checkbox 綁定陣列的情境,留到第八章再一起處理。
v-model 修飾子
原生表單元素的 v-model 也有幾個常用修飾子:
| 修飾子 | 用途 |
|---|---|
.lazy | 等到 change 事件才同步,不是每次輸入都同步。 |
.number | 嘗試把輸入值轉成數字。 |
.trim | 自動移除前後空白。 |
vue
<script setup>
import { ref } from 'vue'

const title = ref('')
const quantity = ref(1)
</script>

<template>
  <main class="app">
    <label>
      標題
      <input v-model.trim="title" type="text">
    </label>

    <label>
      數量
      <input v-model.number="quantity" type="number" min="1">
    </label>

    <p>{{ title || '未命名' }}:{{ quantity }} 份</p>
  </main>
</template>

<style scoped>
.app {
  display: grid;
  gap: 1rem;
  padding: 2rem;
}

label {
  display: grid;
  gap: 0.5rem;
}
</style>拆開 v-model:v-bind 加上 v-on
v-model 看起來像是一條全新的指令,其實它把前面學過的「屬性綁定」與「事件監聽」組成了一個同步迴路。以文字輸入框為例:
html
<input v-model="message" type="text">可以先把它理解成下面這組手動寫法:
html
<input
  :value="message"
  type="text"
  @input="message = $event.target.value"
>:value="message"是v-bind:value:把響應式狀態送進輸入框。當程式改了message,輸入框的value會跟著更新。@input="..."是v-on:input:使用者輸入時,取出事件物件的event.target.value,再寫回message。
為了讓「寫回狀態」的位置更容易閱讀,完整範例把事件處理移到函式裡。兩個輸入框共用同一個 message:第一個手動使用 v-bind 加 v-on,第二個直接使用 v-model。試著在任一個輸入框打字,另一個也會同步更新:
vue
<script setup>
import { ref } from 'vue'

const message = ref('Hello Vue')

function updateMessage(event) {
  message.value = event.target.value
}
</script>

<template>
  <main class="app">
    <label>
      手動版:v-bind + v-on
      <input
        :value="message"
        type="text"
        @input="updateMessage"
      >
    </label>

    <label>
      簡寫版:v-model
      <input v-model="message" type="text">
    </label>

    <p>共享狀態:{{ message || '(空字串)' }}</p>
  </main>
</template>

<style scoped>
.app {
  display: grid;
  gap: 1rem;
  padding: 2rem;
}

label {
  display: grid;
  gap: 0.5rem;
}
</style>共享狀態:Hello Vue
整個資料流可以畫成一個循環:
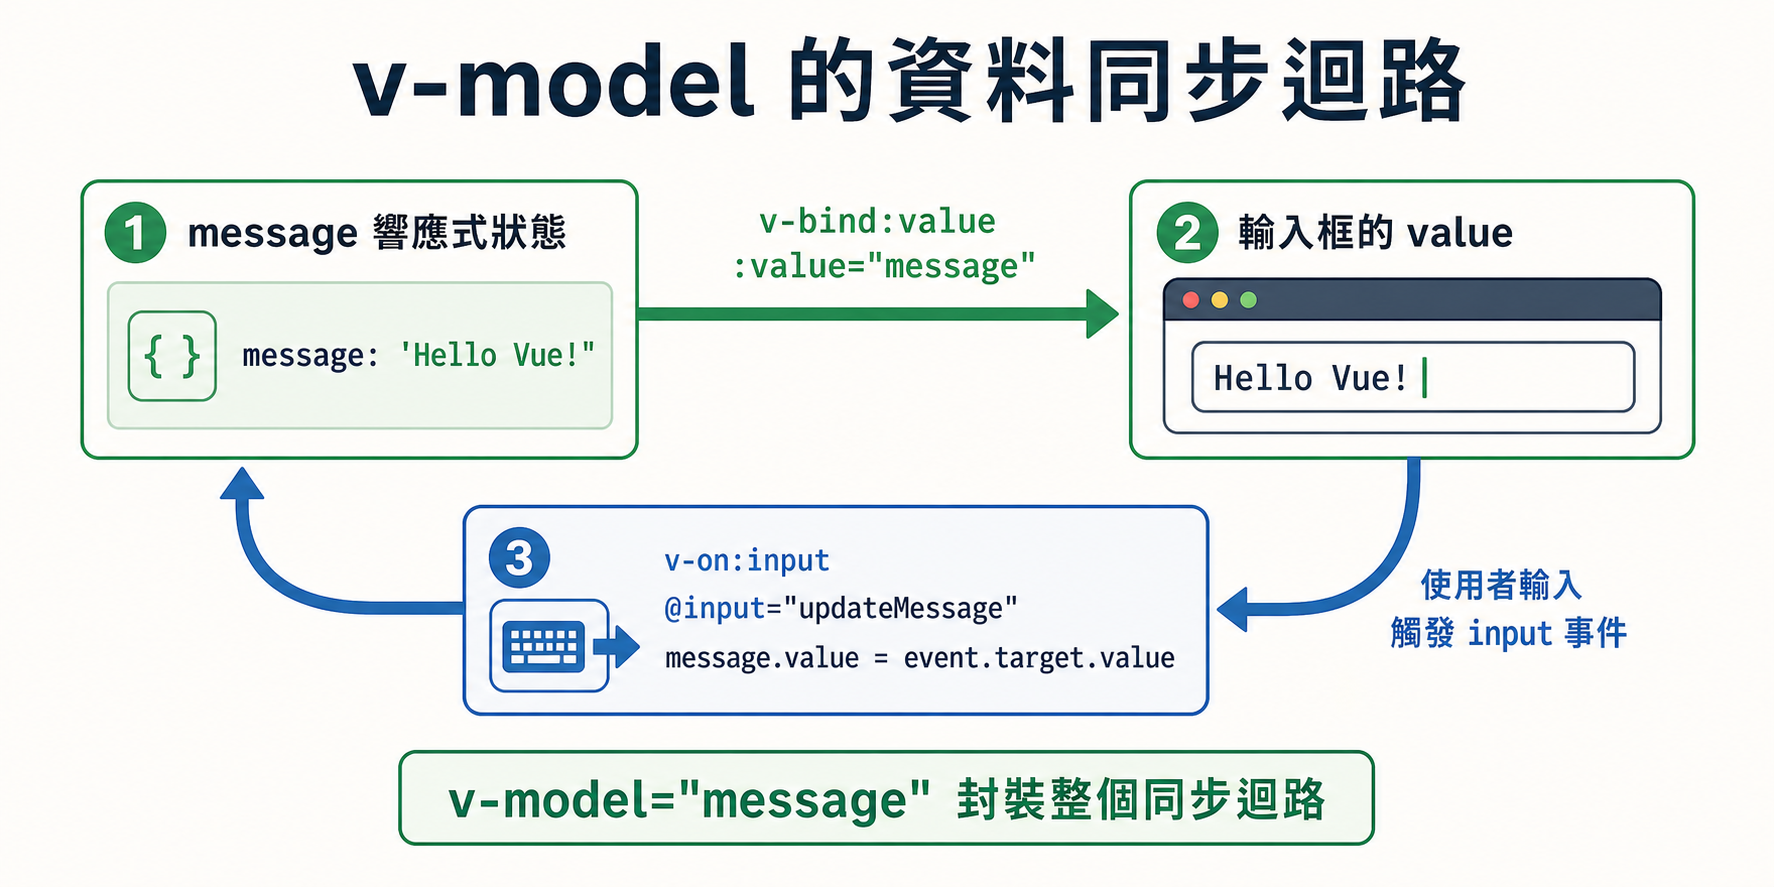
v-model="message" 就是把這個「狀態送進去、事件送回來」的迴路包成一條指令,並沒有偷偷建立第二份資料。這裡的 value 加 input 是文字輸入框的對應方式;checkbox、radio、select 使用的屬性與事件不完全相同,Vue 會依元素種類替我們選擇。
小提醒:v-model 也能用在元件上
這一節只討論原生表單元素的 v-model;父子元件之間也有 v-model 與 defineModel,下一章就會遇到。